Showing posts with label Drawing Exercises and Artifacts. Show all posts

Saturday, November 26, 2022

Draw Christmas things using a grid...

        The following illustrated Christmas toys may be duplicated larger, smaller, or the same size by the use of a grid drawing system. Read about Enlarging and Reducing Pictures Here. After learning this method you can use these pictures as patterns for ornaments, artwork or for making a picture with them. Illustrations include: a rocking horse, drum, ball, football, wheelbarrow, Noah's ark, wooden tree, sail boat, candy cone, trumpet, sled, book and lamb on wheels.

Teaching students to transfer images by drafting a grid and making comparisons
reinforces many math and artistic skills.

Friday, March 18, 2022

Steps to draw a woodchuck, a weasel, and an opossum...

It takes only five steps to draw this woodchuck.

       Woodchucks have very coarse hair, a heavy body, short bushy tail, powerful legs and feet that are made perfect for digging. Farmers do not always like them because they can do great damage to a garden or crops. In February the second he wakes from his long winter sleep and appears at the mouth of his burrow, if he sees his shadow it is supposed to be a sign of six more weeks of cold weather!

You can draw a weasel in just five steps too!

       Sometimes farmers do not like weasels because they can kill chickens. But many people love to make coats from this furry little creatures coat! For in the winter time he has a snow white coat, except the tip of his tail which is black. Sometimes he is called an ermine but when spring comes his coat turns reddish brown and then he is called a weasel.

This opossum took six steps to draw.

       An opossum is about the size of a cat and is noted for being very cunning. It has a very long tail which it likes to hang by, head down from a branch. Of course you have heard of "playing possum" which means to play dead; the opossum does this when it is threatened.

Monday, March 14, 2022

Draw bees and clover for St. Patrick's Day

       The series of simple shapes shown above can help you draw a field of clover with bees happily buzzing around the blooms for a Saint Patrick's Day activity. There are three different ways to picture the tiny stripped pollinators.
       The clover blossom and leaves are blocked out first in lightly marked lines, as indicated in figure 1. Continue with your drawing, and when you have finished it, as shown in figure 3., you may sketch as many bees as you like resting lightly on top of the clover blossoms. That is the way we often see bees when they are gathering honey in the summertime. Also include some of the bees flying about your clover drawing as well.

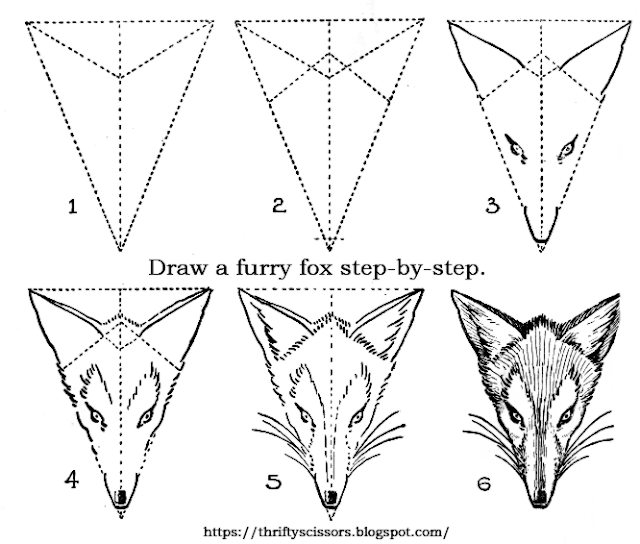
How to draw a furry fox...


      The first thing in drawing is to understand the form of the object or animal you wish to picture. Some animals are oddly shaped or so full of details that students must stop to first give a minute or two in the study of the critter. Find the general outlines of the foxes' head with his ears pricked up and alert. You can see that the ears and head included his snout form four distinct triangles. Once you have drawn these, move on to filling in the smaller details like his nose, his whiskers, and eyes. The rest of his head then may be easily filled out.

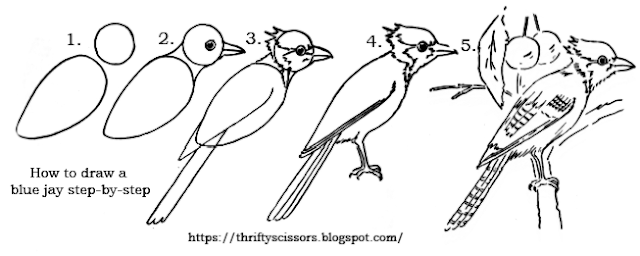
How to draw a peacock, an ostrich and a blue jay...

       Draw three interesting birds: the peacock, the ostrich and the blue jay, using simple shapes. Step-by-step illustrations are shown below so that young students may discover just how simple it is the accomplish these drawing exercises.


       When you first look at a Peacock you might think he would be difficult to draw. But if you just break down his body into simple shapes starting with an oval, drawing becomes simple. Add a head, then his feet, next his wings and last his beautiful tail.

       Start with a circle to draw the ostrich. Some say that if he can't see you, he thinks that you can't see him. He is the largest bird in the world and can't even fly! But how he can run and kick with those giant long legs of his!

 
       The blue jay is a member of the Crow family, he is not such a plunderer as the Crow. In fact, he does a great deal of good by eating many insects that feed on the foliage of trees. He has a bad habit of being meddlesome. This makes him very unpopular in bird society and when he approaches a tree, the other birds fly away.

Sunday, March 13, 2022

A fun drawing game for a crowd

 
       This is an old parlor game sometimes referred to as "The Artist's Menagerie" 
      A pencil and a piece of paper are given each player. The paper is folded in three. Each draws a head of a man, or beast, or fish, according to the fancy of the moment, on the upper third, carrying the lines of the neck just over the fold, as a guide to the next artist, and fold it down, and passes it to his left-hand neighbor. He draws a body proceeding from the lines of the neck, folds it over, and passes it on. The third player adds the legs. The paper is then opened, and frequently the picture will resemble the absurd example shown here. The combinations are often even sillier than the sample drawing!

More Drawing Games:

Sunday, January 28, 2018

Draw Fun Valentine Cartoons!

"A Teddy Bear Mails A Valentine" (four steps)
        Here are two fun little Valentine cartoons or process drawings for teachers to draw on a chalkboard or whiteboard at the front of the classroom. Students can follow the steps at their own tables using a pencil, eraser and coloring supplies. After watching and completing their own drawing give them plenty of time to color their drawings in and encourage them to add their own details.
       This kind of drawing activity teaches students to listen and observe carefully and homeroom teachers can certainly use this method of practice drawing to teach additional lessons about shapes and sizes.
"A Valentine For Miss Hippo" (three steps)

Tuesday, September 12, 2017

Practice drawing with the use of a grid...

Grid superimposed on top of a sketch of horse and cat.
ENLARGING AND REDUCING PICTURES.

       A simple picture may be enlarged by means of clots and dotted lines to guide the eye, as shown on the next page, where we have a number of compound curves applied to vase forms, which are to be reproduced the same size below and enlarged on the opposite page. If, however, the picture is not a single figure, but contains a large amount of detail, it is best to enlarge it by means of squares, as shown just left. To do this, take the original, and divide it into a number of squares, as shown in the small figure. If the picture is desired twice as long as the original make a square twice its dimensions, or, if it is to be reduced and it is desired to have it only half the length of the copy, then the square should be made only one-half the dimensions of the original. For instance, Fig. above, left is a small picture, which measures two and one-half inches long by two inches wide. We want a picture five inches long, consequently, we draw a square twice the dimensions of the small picture, or five inches long by four inches wide. This large square is now divided into five squares in length by four squares in width, or just the same number as have been made on the copy, but, of course, those are proportionately smaller.
       The eye and hand now have a guide, and by noting the relative position of the outlines in the original to the corners and edges of the squares, and by carefully following this guide an enlarged picture, correctly proportioned, may be made.
       In placing the details of the picture care should be taken to place correctly in the enlarged picture according to their position in the copy. If the eye of the horse is in the corner of a square in the small picture, a correspondingly large one should be similarly placed in the enlarged picture. The cat's tail extends to the upper line of the third row of squares in the original, and should do the same in the reproduction. In drawing the horse's ears, note the proportion of the small square that is covered by them, and by following the same proportions in the large square, they may be accurately enlarged.
       To reduce a picture, make a square the size desired; divide it into squares, and the copy into the same number of squares. This will furnish a guide by which any large picture may be accurately reduced to the size desired, the same as in enlarging. Practice on the pictures given, on loose paper, and do not attempt to reproduce on the pages left in this book until creditable work can be done. Cline
Above you can see the sample grid drawings that I've made from pictures cut and laminated from magazines.
Students may use these to practice enlarging and reducing images on grids during free drawing time in the art classroom.

Wednesday, October 30, 2013

Practice Shading An Owl

This owl is wide awake. Give him big yellow eyes and practice shading in all of his little feathers.
       Above is the "digital tracing," of the image. Students may look at the original sample below in order to practice shading techniques on top of the printed digital tracing. After a student learns shading techniques with a number 2 pencil, he or she may choose to try working with colored pencils or even watercolors in order to enhance the digital tracing above.


Sunday, October 20, 2013

How To Draw a Halloween Cat

How to draw a Halloween cat by E. G. Lutz. Printable instruction sheet.


Once you've mastered drawing the simple cat above, why not try drawing a black cat on top of black paper like the one shown in the video below?


Draw Even More Black Cats:

Wednesday, October 9, 2013

How to Draw: A Cow

Step-by-Step way to both fold paper to draw a cow's head and also how to draw
details of the cow's features.


Directions for Drawing A Cow: Fold a square sheet of paper from corner to corner in every direction before drafting the proportions of this cow's head. This simple exercise teaches young students to use basic geometry to draw a cow.

The Cow
by Robert Louis Stevenson

The friendly cow, all red and white,
I love with all my heart;
She gives me cream with all her might,
To eat with apple tart.

She wanders lowing here and there,
And yet she cannot stray,
All in the pleasant open air,
The pleasant light of day.

And blown by all the winds that pass
And wet with all the showers,
She walks among the meadow grass
And eats the meadow flowers.

Wednesday, April 24, 2013

Learning to Draw Birds

In drawing, all objects should be studied under the general heads of:
  • The Copy, or Imitation.
  • The Object, or Observation.
  • The Memory and Imagination.
       In general, these three divisions should go hand in hand, each helping to explain and make clear the others. But if an order is followed in the study of birds, the best one for young pupils is as follows: (1) The copy; (2) memory and imagination; (3) the object.
       This order, however, is not intended to be arbitrary. If the object is something that can be leisurely studied, like a leaf, or a flower, then an order similar to this should be followed: (1) The object; (2) the copy; (3) memory and imagination.
       The principle of the construction of all birds is, in general, the same ; the difference is in the proportion and minor details. By learning the proportions and general features from pictures and drawings, much time will be saved, and the work made more effective and less discouraging than if the study is attempted from the living bird alone. This does not mean to blindly copy the drawings of others, but to study them intelligently, to study them with a view of learning their form and proportion and the general principle of bird construction. To learn such points  the following: The size of the head as compared with the body; the movement of the tail, head and body; how the feet are placed under the body to give perfect balance; how the wings rest on the body, and their movements when flying. All of these can be studied from drawings coupled with observation, and then verified on the real bird, much better than from the real bird alone. It is doubtful if one untrained in drawing can make very much headway learning to draw from such a restless bit of animation as a live bird, with its multiplicity of markings and numberless details. One must have both knowledge of the bird and skill in drawing to do this.
  • Balance
  • Character
  • Divisions of Study
  • General Directions
  • Drill Exercises
       Here is a simple sketch of how to draw a bird. Memorize how to draw birds from these instructions and soon little birds will be dancing across your notebook in no time.

More Related Content: