Pages
Tuesday, December 19, 2023
Christmas With The Squirrels
The Pride of Toys
Tuesday, December 12, 2023
A Peppermint Christmas Tree Tutorial
![]() |
| A decorative, peppermint Christmas tree made from a cone for a mantle, shelf or table display. |
The supplies that you will need to accomplish this Christmas project include: a Styrofoam cone, a recycled yogurt cup, Sculpey oven bake clay, red spray paint, white acrylic paints, fancy gift wrap paper, a miniature wooden ornament for the tree topper, a toothpick, Mod Podge, and tacky white glue.
- Roll out the oven bake clay into many small balls. If you make many of these the project will take longer to craft. If you make fewer of them, a younger student will be able to complete a simpler version of the tree.
- Place all of the clay balls on a cookie sheet and then gently press each one flat with you finger tips. Bake at 275 degree oven for 8 or 9 minutes. Check the instructions printed on the box of the Sculpy to make sure if these are the same as mine. Choose those instructions over mine if you should have a different type of clay.
- After these two steps, even older children may need adult supervision with the baking and spray painting.
- Wear oven mitts. Remove the flattened clay with a cake knife or thin spatula before all of the rounds cool completely.
- Place the miniature, faux peppermints into a cardboard box and spray paint them red. Do this step of the craft outdoors because spray paint is toxic. Wait for the paint to dry completely and then repeat the same step for the unpainted sides of the clay pieces.
- Now apply small drops of tacky white glue to the pretend candies and stick these to the surface of the tall cone on it's sides only. You will need to do a side at a time allowing the glue to dry before turning the cone to glue more pieces on. Keep the cone on it's side for this process. Once you have all of the clay candies on the cone and the glue is dry, you may then turn the cone upright.
- Using a very tiny brush, paint the white swirls onto each red faux candy. Let all of the paint dry.
- Meanwhile, clean the surface of a used yogurt container.
- Spread Mod Podge on it's outside surface and apply the decorative paper. Let dry.
- Glue the yogurt cup 'stand' to the bottom of the decorated cone.
- Glue a wooden ornament to a toothpick. Let dry.
- Poke the toothpick down into the top of the Styrofoam cone with some glue and let dry. Paint the wooden ornament in the colors of the tree, red and white.
- Seal the entire surface with Mod Podge
Sunday, December 10, 2023
The Christmas Dog
''A little girl named Peggy,'' said daddy, ''wrote a letter to Santa Claus, and this is what she said:
''Dear Santa Claus:
Paper Chain Wreath Craft
![]() |
| The finished paper chain wreath. |
![]() |
| Left, the wreath with attached paper chain. Center, the snowmen are smiling! Right, a red bow tops everything off! |
A Story of the Fireplace
The Toy Shop
Saturday, December 9, 2023
Make a Frosty Ice Skate Paper Wreath
![]() |
| I colored my ice skates blue, green and red. But you may color them however you wish! |
To make this ice skate paper wreath you will need to gather the following supplies: a paper plate, ribbon for a hanger, silver, blue and white scrap wrapping papers, a print of the ice skates below, colored pencils, white school glue and a stapler.
Step-by-Step Instructions:
- Remove the center of the paper plate using the tip of their scissors and cutting along the scored center circle. Discard the circle into a paper craft bin for other use.
- Punch a hole into the top of the wreath.
- String a blue or grey ribbon through and knot it for the hanger.
- Use white school glue to attach multiple icy branches to the paper plate wreath. To make many branches quickly, stack four or five layers of wrapping paper on top of each other and cut simple branch shapes all at once. (see the photo below)
- Download the ice skate clip art provided at the bottom of the blog post; print it out on your home computer and color the ice skates however you like.
- Cut these out and paste them to the front of your wintery wreath.
- Hang your skate wreath in your classroom or home!
![]() |
| Left, the wreath with icy covered branches attached with glue. Right, the branches up close. |
![]() |
| I used a metallic bronze pencil to color in the blades at the bottom of my skates. Print and assemble Victorian looking ice skate ornaments at my Belsnickle Blog. |
![]() |
| Ice Skates for personal or classroom use only. |
Friday, December 8, 2023
Make a Christmas Card Window to Hang
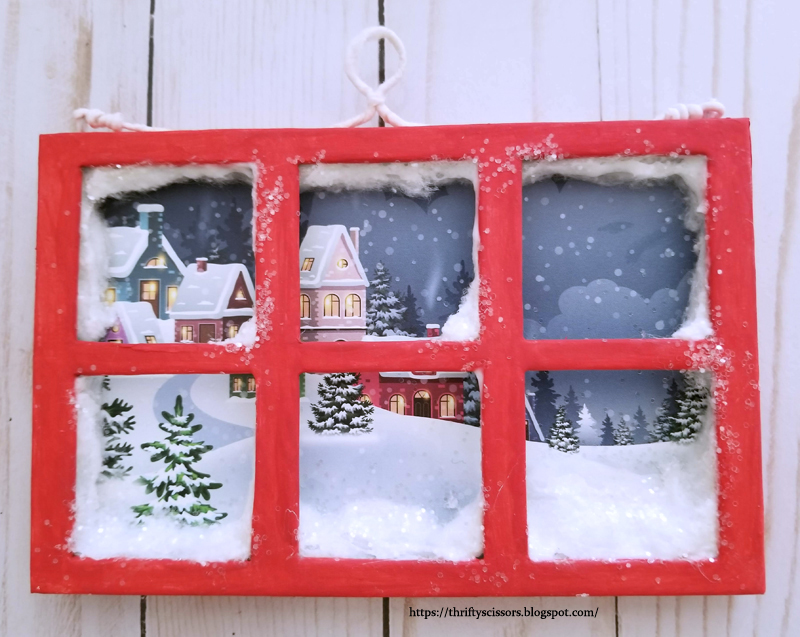
Young children can either hang this holiday card window on a Christmas tree or in their room or as a decoration anywhere in their home to remember their loved ones.
![]() |
| A charming and traditional way to recycle past memories and Christmas cards. The greeting card, Christmas window craft has been around for 100 years! |
- Collect and save old Christmas cards that illustrated charming scenes of outdoor views, people sledding, ice skating, or of a tiny neighborhood, like the example shown above.
- Measure your Christmas card so that you can make a window pane the same size.
- Cut the window pane from scrap cardboard leaving square or diamond cut panes intact.
- Cut a shallow set of side pieces approximately 1/2" wide to glue around the exterior of the window pane before attaching the card if you are looking at an outdoor scene with snow. In this shallow space will create a shallow space you may wish to glue cotton batting 'snow' and glitter to make the winter view more convincing.
- Paint the window pane. Let dry.
- Glue the recycled Christmas view to the backside of the window pane.
- Shape wire and attach at the back or top of your window so that it may be hung.
- The History of Christmas Cards
- Craft Miniature Snow Scene Baubles - using recycled Christmas cards too!
- Decoupage Retro Paper Mache Baubles - use left over Christmas paper and cards
DIY a Christmas Toy Soldier Candy Container
To make this candy container you will need the following supplies: a recycled coffee creamer bottle, masking tape, permanent black marker, pom poms, two buttons, small amount of yellow or gold foam sheet, red braid, acrylic paints, Mod Podge, hot glue and hot glue gun.
- Wash out the interior of the bottle and cap thoroughly before using it to craft with.
- Apply masking tap to the entire surface of the bottle, excluding the cap only.
- Draw a toy soldier design on the bottle, use my own if you wish. Draw with a permanent marker once you have the end design determined.
- Paint with bright, cheerful colored acrylic paints.
- Hot glue one details like buttons, foam sheet ruffles, pom-poms and a matching red braid to hold on the toy soldiers tall, dramatic hat...
- Mod Podge the painted surfaces.
- Unscrew cap to insert your choice of candy, I prefer M&Ms. Replace cap which may be opened at the top to pour out small candies as desired.
A "Hands On" Christmas Wreath Craft
![]() |
| Finished "hands-on" classic Christmas wreath craft. |
- one paper plate per student
- green construction paper
- painted green paper
- paste paints or finger paints (shades of green)
- white butcher paper for paste painting
- plastic combs (Hair combs in pack from Dollar General will do.)
- red pom-poms
- yarn for hanging the wreath
- stapler for attaching the hanger
- white school glue
- scissors
- green glitter (optional)
- Day One: Students paint green paste papers using plastic combs and finger paint. Use generous amounts of pale and dark green paints to comb across white butcher paper and sprinkle in some green glitter too! Let the paper dry over night or for two days if needed.
- Day Two: Students will trace around their hands on top of the paste paper and green construction paper using a pencil, green marker, or white crayon. Then they will cut out their hand tracings to use to cover the paper wreath. (above)
- Day Three: Students assemble their wreaths on the paper plates. Older students may cut out their own paper wreaths from the paper plates. Remove the center of the paper plate using the tip of their scissors and cutting along the scored center circle. Discard the circle into a paper craft bin for other use.
- Punch a hole into the top of the wreath.
- String a red ribbon through and knot it for the hanger.
- Use white school glue to attach hand traced 'evergreens' to the paper wreath.
- Glue on red pom-poms for berries.
Patterns for Penguins
![]() |
| The versatile, playful penguin pattern! |
![]() |
| Template/Patterns for construction paper penguins by kathy grimm. |
Cut Simple 3-D Christmas Trees
To make these easy little three-dimensional paper trees you will need to download and print on either your home computer or school computer the template provided here.
The following supplies are needed: a stapler, hot glue and glue gun, colorful papers, scissors, and pom poms.
- Download and print the template for our paper Christmas tree. Link above.
- Cut-out the tree shape and trace around it on top of 3 to 4 stacked papers. I chose green and red, but any color would be attractive. Cut the stack all at once.
- Fold each duplicate paper cut tree separately, in half exactly.
- Staple down the center of the stack on the fold line. You will need to do this four times down the center.
- Now fan out the paper tree so that it stands on it's own.
- Hot glue pom poms in between the tree halves to decorate.
Craft a Paper Snowman Wreath
This easy paper snowman wreath is made with: a white paper plate, a stapler, construction paper (black and white), pom poms, decorative scrapbook papers, white school glue, a cord for the hanger and student scissors.
![]() |
| Left the basic snowman shaped wreath. Center, glue the colorful Christmas tie between the wreath and the snowman head. Right, the finished wreath with all the cheerful trims. |
- Download and print out the template pieces from our blog for this snowman craft here. This particular craft may be used at Christmas using themed papers or it could also be made just during the winter months using different themed papers too.
- Poke a small hole into the paper plate using the tip of your scissors. Then cut out the circle in the center of the paper plate marked by a seam. This cut-away section will become the head of your snowman.
- Staple the head to the top of the paper plate rib to create a basic snowman wreath. (see photos above)
- Now cut out the bow pattern and trace around it on top of decorative paper. Cut out the bow, paste this between the head and body of the snowman wreath using white glue. Let dry.
- Using a black magic marker, draw the different sections of the bow shown on the printed template copy of it.
- Cut out the pattern for the snowman's top hat and trace around this on top of a piece of black construction paper.
- Glue a decorative paper ribbon on top of the top hat and add trims. I've included a tiny holly leaf template for this.
- Glue or staple the top hat onto the snowman's head.
- Glue on the pompoms for his eyes, nose, mouth and holly berries.
- Cut long strips of white construction paper approximately 3 inches wide.
- Cut fringe into these strips and curl them with your scissors.
- Glue the fringes onto the snowman wreath to add texture and 3D surface area.
- Glue on a red tie ribbon to hang the wreath from his top hat.
An easy paper Christmas light garland craft...
![]() |
| Left, rainbow colored lights. Right, yarn 'electric cord' connecting the lights in one long garland. |
These easy little vintage Christmas lights look so cute on a teacher's bulletin board or on a child's Christmas tree in their bedroom. Use the template/pattern below to cut them out of layers of festive colored construction papers all at once. Then paste on black switches or color these with a black crayon. Paste a black yarn electrical cord on the backsides of the bulb switches connecting the light bulbs to one long garland.
![]() |
| Templates for three different crafts at Thrifty Scissors: electric light bulb garland, a snowman wreath and 3-D paper Christmas trees. |