Printed copies of my butterfly patterns provided below
wooden skewers (clip off the tips)
long straws
scissors
white school glue
masking tape
a variety of bright magic markers
crepe paper streamers (any color)
stapler
Step-by-step Instructions:
Download, and print the butterfly patterns included below. You may need to enlarge these a bit more in a Word Doc by pulling a corner of the jpg. to the edge of the document's screen.
Color the butterfly kite prints with bright magic markers.
Fold the butterfly's body in half at the
dotted line.
Fold out apart from the first fold each butterfly wing.
Inserted inside the first fold a long straw. Apply a generous amount of white glue to this crease.
Insert your kite string through the drawn circle (hole) behind the straw by pricking through the paper with the tip of your scissors. This straw will give your kite strength. Tie a knot with the string and include the amount of length that will allow a small child to fly the kite perhaps no more than five yards above his or her head.
The backside of your kite should include a wooden skewer pasted
horizontally to the top edge of the kite. I glued mine down and then
taped over it in order to reinforce my kite's strength. This is the
detail that will actually insure your kite's ability to fly. Be sure to clip off the pointed tips of the skewer before gluing it down to the backside of the kite. You don't want any young students poking each other with the tips during the assignment.
Staple on some colorful crepe paper "tails" in whatever color pleases your students.
Far left, As you can see, the butterfly's body is folded in half at the dotted line and then the wings are folded out apart from the first fold. Inserted inside the first fold is a long straw. It is held in place with white glue. Next, Although I have colored the butterfly's body, I have left the hole white so that you may see that the kite string should be tied off here, behind the straw. Insert the string through this hole and behind the straw. The straw will give your kite strength. Center, The backside of your kite should include a wooden skewer pasted horizontally to the top edge of the kite. I glued mine down and then taped over it in order to reinforce my kite's strength. This is the detail that will actually insure your kite's ability to fly. Far right, Staple on some colorful crepe paper "tails" in whatever color pleases your students.
Two butterfly kite patterns for young students to assemble and color.
Click directly onto the image in order to download the largest possible file size.
My young students enjoyed coloring their butterfly kites with bright colored markers.
I assembled the kites ahead of time for these little ones so that the only work they would
need to do would be to color in their butterflies and staple on the crepe paper tails.
James Montgomery Flagg 1917 poster: "Boys and girls!
You can help your
Uncle Sam win the war -
save your quarters, buy War Savings Stamps" /
James Montgomery Flagg .
Uncle Sam (initials U.S.) is a common national personification of the American government that, according to legend, came into use during the War of 1812 and was supposedly named for Samuel Wilson. The first use of Uncle Sam in literature was in the 1816 allegorical book "The Adventures of Uncle Sam in Search After His Lost Honor" by Frederick Augustus Fidfaddy, Esq. An Uncle Sam is mentioned as early as 1775, in the original "Yankee Doodle" lyrics of the Revolutionary War.
It is not clear whether this reference is to Uncle Sam as a metaphor
for the United States, or to an actual person named Sam. The lyrics as a
whole clearly deride the military efforts of the young nation,
besieging the British at Boston. The 13th stanza is:
"Old Uncle Sam come there to change
Some pancakes and some onions,
For 'lasses cakes, to carry home
To give his wife and young ones."
The term Uncle Sam is reputedly derived from a Samuel Wilson, a meat packer from Troy, New York,
who supplied rations for the soldiers. There was a requirement at the
time for contractors to stamp onto the food they were sending, their
name and where the rations came from. Wilson's packages were labeled
“E.A – US.” When someone asked what that stood for, a coworker joked and
said “Elbert Anderson (the contractor) and Uncle Sam,” referring to Sam
Wilson, though it actually stood for United States.
As early as 1835 Brother Jonathan made a reference to Uncle Sam
implying that they symbolized different things: Brother Jonathan was the
country itself while Uncle Sam was the government and its power.
By the 1850s the name Brother Jonathan and Uncle Sam were being used
nearly interchangeably to the point that images of what had been called
"Brother Jonathan" were now being called Uncle Sam. Similarly,
appearance of both personifications varied wildly. For example, one
depiction of Uncle Sam in 1860 depicted him looking like Benjamin
Franklin, (an appearance echoed in Harper's Weekly's
June 3, 1865 "Checkmate" political cartoon) while the depiction of
Brother Jonathan on page 32 of the January 11, 1862 edition Harper's Weekly looks more like the modern version of Uncle Sam (except for the lack of a goatee).
However, even with the effective abandonment of Brother Jonathan
(i.e. Johnny Reb) near the end of the Civil War, Uncle Sam didn't get a
standard appearance until the well-known "recruitment" image of Uncle
Sam was created by James Montgomery Flagg (inspired by a British recruitment poster showing Lord Kitchener
in a similar pose). It was this image more than any other that set the
appearance of Uncle Sam as the elderly man with white hair and a goatee wearing a white top hat with white stars on a blue band, a blue tail coat and red and white striped trousers.
The image of Uncle Sam was shown publicly for the first time,
according to some, in a picture by Flagg on the cover of the magazine Leslie's Weekly, on July 6, 1916, with the caption "What Are You Doing for Preparedness?" More than four million copies of this image were printed between 1917 and 1918.
While Columbia had appeared with either Brother Jonathan or Uncle
Sam, her use as personification for the U.S. had declined in favor of
liberty, and once she became the mascot of Columbia Pictures in the 1920s, she was effectively abandoned.
Flagg's image also was used extensively during World War II during
which the U.S. was codenamed 'Samland' by the German intelligence agency
Abwehr. The term was central in the song "The Yankee Doodle Boy", which in 1942 was featured in the musical Yankee Doodle Dandy.
"The Yankee Doodle Boy" from Yankee Doodle Dandy
There are two memorials to Uncle Sam, both of which commemorate the life of Samuel Wilson: the Uncle Sam Memorial Statue in Arlington, Massachusetts, his birthplace; and a memorial near his long-term residence in Riverfront Park, Troy, New York. Wilson's boyhood home can still be visited in Mason, New Hampshire. He is buried in Oakwood Cemetery, Troy, New York.
In 1989, "Uncle Sam Day" became official. A Congressional joint resolution designated September 13, 1989 as "Uncle Sam Day" (birthday of Samuel Wilson).
Top left, the first recorded caricature of Uncle Sam as it appeared in Punch, the London paper,
in 1844; lower left, first American cartoon showing Uncle Sam with striped trousers, published in
1852; right, Thomas Nast's Uncle Sam, the first with whiskers, starred vest and striped trousers;
center, Uncle Sam as drawn by Robert William Satterfield, The Day Book's famous cartoonist.
Advertisement from The Washington Times, March 1, 1918 depicting Uncle Sam
The Rainbow Fish is an award-winning children's book drawn and written by Marcus Pfister, Swiss author and illustrator, and translated into English by J. Alison James. The book is best known for its morals about the value of being an individual and for the distinctive shiny foil scales of Rainbow Fish. Decode Entertainment turned the story into an animated television series of the same name, which has aired on the HBO Family television channel in the United States since 1999.Read more...
I designed my own versions of rainbow fish for my preschoolers from extra thick, large, white paper plates. Because I am working with preschoolers, I will need to assemble the project up to the point of coloring for these little ones. However, 1rst and 2nd grade teachers may choose to teach every step to their students over a period of two to three sessions.
Supply List Per Student
scissors
white school glue
magic markers
stapler
glitter or metallic paper for scales
pattern (below)
two large white paper plates
white typing paper
white string
Step-by-step Instructions:
Print and cut out the pattern. Cut the body first and then trace it onto the inside of a large, white, paper plate. Then flip the pattern over and trace it again to the inside of an additional large, white, paper plate. Cut out these two fish and staple them together with the fins facing fan out.
Cut out the face pattern and trace around it twice onto a piece of white typing paper. Then cut these two faces out and staple them both to the correct position on top of each side of the paper fish.
Draw both the fins, eyes, and mouth onto each side of the dimensional paper fish.
Paint or color the fish on both sides
Cut additional fins (circles) from metallic paper and glue these between the fish face and body.
Then paste down the edge of the fish face to the paper fish body where the scales meet the fishy cheeks.
Staple a long string between the two fish bodies to hang your school of rainbow fish from the ceiling.
Left, I cut and traced my xerox paper pattern onto a paper plate and cut this first fish to trace around for all of my other fish. Don't forget to trace this same fish in the reverse also in order to have both a front and a back fish. Center, See how the fish fits easily into the large paper plate so that students or teachers can duplicate this version's shape. Right, Students may then draw their own fins and face onto the assembled pattern. The face of the fish must be traced twice and cut from white typing paper. You will need to staple one on each side of the fish body.
I stapled two paper fish plates together to give my rainbow fish a bit of dimension and strength. In fact, this paper plate version could stand up to paint if teachers should prefer to use it. I took care not to staple the face onto the body near the edges of the fins. This will make it simpler to glue in the metallic fins.
The blue side of my teacher's sample.
This is the back side, orange version of my teacher's sample.
Print, cut and trace the fish body template and head both. Remember to reverse and cut/trace the body on a second paper plate. You will need to cut and trace two fish heads on regular paper in order to make both the front and back side of this rainbow fish craft. Because teachers will likely hang these paper fish from the ceiling, both sides of the fish should be colored.
By Marcus Pfister. Read by Ernest Borgnine. "The Rainbow Fish is an
award-winning book about a beautiful fish who finds friendship and
happiness when he learns to share. The book is best known for its morals
about the value of being an individual and for the distinctive shiny
foil scales of the Rainbow Fish." Visit Storyline Online for more videos.
Are there such things are real rainbow fish? The rainbowfish are a family (Melanotaeniidae) of small, colourful, freshwater fish found in northern and eastern Australia, New Guinea, islands in Cenderawasih Bay, and the Raja Ampat Islands. The largest rainbowfish genus, Melanotaenia, derives from the ancient Greek melano (black) and taenia
(banded). Translated, it means "black-banded", and is a reference to
the often striking lateral black bands that run along the bodies of
those in the Melanotaenia genus. Read more...
More activities and lessons used with "The Rainbow Fish"
My "hybrid" sailor's Valentine craft for young students includes both real
and drawn seashells. I needed to develop a method for producing this
craft on a very limited budget for my classroom. This is the solution that
I came up with for next year's ocean unit.
A sailor's valentine is a
form of shellcraft, a type of mostly antique souvenir, or sentimental
gift made using large numbers of small seashells.
These were originally made between 1830 and 1890 and they were designed
to be brought home from a sailor's voyage at sea and given to the
sailor's loved one or loved ones.
Sailor valentines are typically octagonal, glass fronted, hinged wooden
boxes ranging from 8" to 15" in width, displaying intricate symmetrical
designs composed entirely of small sea shells of various colors glued
onto a backing. Patterns often feature a centerpiece such as a compass
rose or a heart design, hence the name, and in some cases the small
shells are used to spell out a sentimental message.
Although the name seems to suggest that the sailors themselves made
these objects, a large number of them originated in the island of Barbados,
which was an important seaport during this period. Historians believe
that the women there made the valentines using local shells, or in some
cases using shells imported from Indonesia, and then the finished products were sold to the sailors.
In his book Sailors' Valentines,
John Fondas concludes that the primary source for sailors' valentines
was the New Curiosity Shop, located in McGregor Street, Bridgetown,
Barbados, and a popular shop where sailors would purchase souvenirs.
The shop was owned by the English brothers B.H. and George Belgrave.
Fondas' research tells of a sailors' valentine reconstruction, during
which the reconstructing artist found pieces of a Barbados newspaper
inside the backing.
Today, antique sailors' valentines are collectibles, valued for their
beauty and unusual qualities. Collector interest has sparked a
resurgence in sailors' valentines as an art form, and shell kits and
patterns are now sold at craft shops. Many sailors' valentines, both new and old, can be found on Nantucket, Massachusetts. Wikipedia
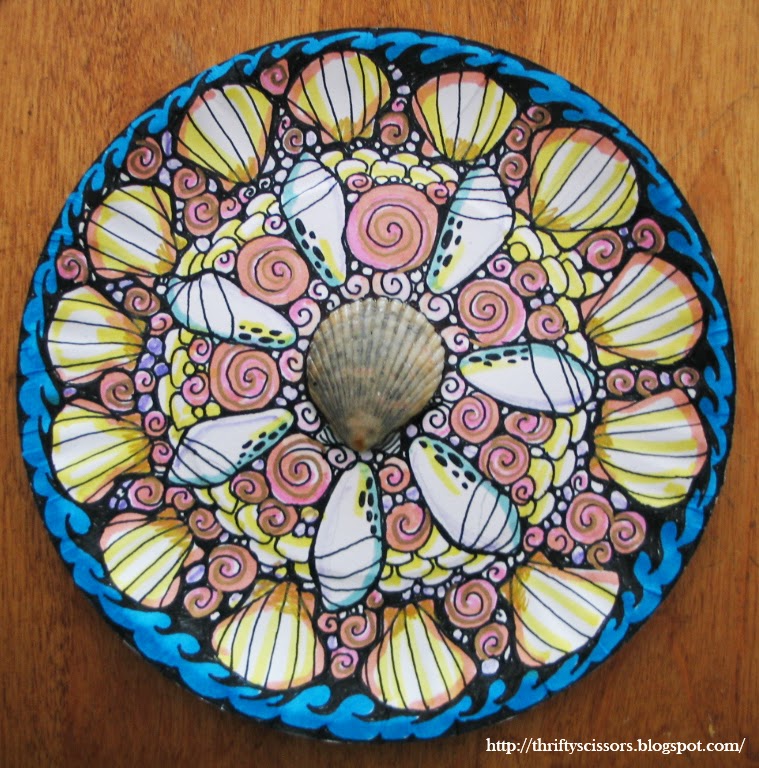
I adapted this paper sailor's valentine project for very young students by printing small black and white shells in advance for them to cut, color and then glue down into a pattern of their own choosing during our craft time for next year. My budget is very limited; I estimate that I will spend approximately 5 cents per student on this craft by the time it is finished. Teachers may, of course, glue real seashells to heavy weight paper plate alternatives if they live in areas where seashells are free and plentiful. I will glue a handful of scallop shells that I collected during a beach vacation to the middle of each child's plate to give them something from the sea to touch and view.
If your students are much older than my own, first, second, third or even fourth; you may teach a similar project using larger paper plates, more real shells and a chart displaying types of seashells. In fact, this would be a nice project to incorporate into a unit about sea life/ oceans in a regular classroom. My teacher's sample on this post was drawn free hand. Students in fourth grade would certainly be able to create this kind of "doodle" challenge without the aid of cut and pasted design elements.
Craft Supplies:
small white paper plates
one real scallop shell per project
tacky white glue
a variety of magic markers
sheet of black and white seashells and scissors for young students (optional and included below)
My teacher's sample Sailor's Valentine drawn in black and white prior to coloring.
Left, I pasted a scallop shell down with white tacky glue before drawing my seashell design. I've estimated that I will not have more than twenty children to teach this project to next year, so I have already completed this step in advance for my own resources. Center, I drew my shell design first in black ink. Right, I then used pastel colored magic markers to color the shell design.
A few close up shots of the completed paper Sailor's Valentines. I will staple a black ribbon to the back side of the paper plate in order to hang this project on the wall.
Small seashells for pattern making. I will print and cut these out in bulk for my preschool
students to paste into their Sailor's Valentines.Teachers may wish to do likewise for
their younger students.
My teacher's sample of the octopus clock made from a paper
plate, magic markers and a bit of industry. The long "hand"
of my clock is one of the octopus tentacles, the smaller
"hand" mimics a piece of kelp or coral. Please pin the
photos only not templates, so that folks will have
a reason to pay us a visit!
This little paper plate craft is so easy to assemble. Simply print, cut and paste the octopus parts as they are seen below. I backed the "arms" of the clock with cardboard so that the project might be crafted with durability. Punch a hole in each clock arm piece and also in the center of the paper plate. I used the pointed tip of my scissors to make a hole in the plate. Then I inserted the brass brad through all three holes and bent back the prongs on the backside of the paper plate. Now my students will be able to spin the "arms" or "hands" of the clock to mimic those of a real clock.
I have included two options for the project so that teachers may either use my own solution for the coloring of the project or give their students simpler unadorned versions so that they can come up with their own unique interpretations of this paper plate craft.
Craft Supplies:
large white paper plate
variety of magic markers
printed template of octopus (blank or decorated)
white glue
scissors
hole punch
printed numbers 1-12
brass brad
The clock as it appeared in black and white before I colored it. I printed out the numbers 1-12 in
a classic font and pasted these around the edges of the paper plate to mimic a real clock face.
Here are a few closeup shots of my paper octopus clock craft.
Make sure to click directly on to the templates in order to download the largest versions for printing.
Author Cheryl Block discussing award-winning "You're Blushing,
Little
Octopus," a children's picture book with a heart-warming story
based on
science and packaged with a CD-ROm as entertaining
as it is educational.
A simple ABC craft using the popular "Chicka, Chicka, Boom Boom" story by Bill Martin Jr.
I taught
this simple craft to three year olds at our school. Although our school
is a private one, this would also be an easy craft to assemble and
teach at a public nursery/early learning center as well. "Chick, Chicka,
Boom, Boom," by Bill Martin Jr. is a very popular book in secular
schools. I've listed the directions and supplies below and also have
included a palm leaf pattern for those of you who would prefer that your
students color their branches instead of cutting these from green
construction paper.
Cutting the palms would be an appropriate task to be included in this
little lesson if it were done in a first or second grade classroom.
Students in these grades should have been using scissors long enough to
be able to cut curves and fringe the edges of paper without cutting them
entirely off altogether.
"Chicka, Chicka, Boom, Boom" cover
Craft Supplies:
ABC stickers
green, black and brown construction paper
markers
white school glue
scissors (optional)
palm leaf pattern
sandpaper (for the cocoanuts!)
Step-by-Step Directions:
Teachers may
download and print the pattern in multiples prior to the lesson. Cut
these out in advance for students who have yet to become very familiar
with using scissors.
Cut also tree trunks from light brown construction paper and round cocoanuts from sandpaper.
The students should color their palm leaves first.
Then glue these onto their black background paper and then glue the trunk on top.
Then students may color their palm tree trunk.
Give each student a variety of alphabet and number stickers to peal and stick onto their "chicka, chicka, boom, boom"
picture. The pealing of the stickers is an important manipulative skill
to teach three year students. This requires young children to practise
small motor skills in order to complete the task successfully. Encourage
them to peal the stickers by themselves and give them lots of praise
when they accomplish it on their own.
Three year old children can easily complete this little craft.
Download and enlarge these palms in a Word Doc before printing.
More Lesson Plans, Games and Ideas for "Chicka, Chicka, Boom Boom"


