Showing posts with label Paper Plate Crafts. Show all posts

Monday, June 2, 2014

Craft an entire school of "Rainbow Fish" from paper plates!

"The Rainbow Fish" by Pfister.
      The Rainbow Fish is an award-winning children's book drawn and written by Marcus Pfister, Swiss author and illustrator, and translated into English by J. Alison James. The book is best known for its morals about the value of being an individual and for the distinctive shiny foil scales of Rainbow Fish. Decode Entertainment turned the story into an animated television series of the same name, which has aired on the HBO Family television channel in the United States since 1999. Read more...
      I designed my own versions of rainbow fish for my preschoolers from extra thick, large, white paper plates. Because I am working with preschoolers, I will need to assemble the project up to the point of coloring for these little ones.  However, 1rst and 2nd grade teachers may choose to teach every step to their students over a period of two to three sessions.     

Supply List Per Student
  • scissors
  • white school glue
  • magic markers
  • stapler
  • glitter or metallic paper for scales
  • pattern (below)
  • two large white paper plates
  • white typing paper
  • white string
Step-by-step Instructions:
  1. Print and cut out the pattern. Cut the body first and then trace it onto the inside of a large, white, paper plate. Then flip the pattern over and trace it again to the inside of an additional large, white, paper plate. Cut out these two fish and staple them together with the fins facing fan out.
  2. Cut out the face pattern and trace around it twice onto a piece of white typing paper. Then cut these two faces out and staple them both to the correct position on top of each side of the paper fish.
  3. Draw both the fins, eyes, and mouth onto each side of the dimensional paper fish.
  4. Paint or color the fish on both sides
  5. Cut additional fins (circles) from metallic paper and glue these between the fish face and body. 
  6. Then paste down the edge of the fish face to the paper fish body where the scales meet the fishy cheeks.
  7. Staple a long string between the two fish bodies to hang your school of rainbow fish from the ceiling.
Left, I cut and traced my xerox paper pattern onto a paper plate and cut this first fish to trace around for all of my other fish. Don't forget to trace this same fish in the reverse also in order to have both a front and a back fish. Center, See how the fish fits easily into the large paper plate so that students or teachers can duplicate this version's shape. Right, Students may then draw their own fins and face onto the assembled pattern. The face of the fish must be traced twice and cut from white typing paper. You will need to staple one on each side of the fish body.
I stapled two paper fish plates together to give my rainbow fish a bit of dimension and strength. In fact, this paper plate version could stand up to paint if teachers should prefer to use it. I took care not to staple the face onto the body near the edges of the fins. This will make it simpler to glue in the metallic fins.
The blue side of my teacher's sample.
This is the back side, orange version of my teacher's sample.
Print, cut and trace the fish body template and head both. Remember to reverse and cut/trace the body on a second paper plate. You will need to cut and trace two fish heads on regular paper in order to make both the front and back side of this rainbow fish craft. Because teachers will likely hang these paper fish from the ceiling, both sides of the fish should be colored.
More "Rainbow Fish" Crafts:

By Marcus Pfister. Read by Ernest Borgnine.
"The Rainbow Fish is an award-winning book about a beautiful fish who finds friendship and happiness when he learns to share. The book is best known for its morals about the value of being an individual and for the distinctive shiny foil scales of the Rainbow Fish." Visit Storyline Online for more videos.

Are there such things are real rainbow fish? The rainbowfish are a family (Melanotaeniidae) of small, colourful, freshwater fish found in northern and eastern Australia, New Guinea, islands in Cenderawasih Bay, and the Raja Ampat Islands. The largest rainbowfish genus, Melanotaenia, derives from the ancient Greek melano (black) and taenia (banded). Translated, it means "black-banded", and is a reference to the often striking lateral black bands that run along the bodies of those in the Melanotaenia genus. Read more...

More activities and lessons used with "The Rainbow Fish"

Design and Craft a Sailor's Valentine

My "hybrid" sailor's Valentine craft for young students includes both real
 and drawn seashells. I needed to develop a method for producing this
craft on a very limited budget for my classroom. This is the solution that
I came up with for next year's ocean unit.
      A sailor's valentine is a form of shellcraft, a type of mostly antique souvenir, or sentimental gift made using large numbers of small seashells. These were originally made between 1830 and 1890 and they were designed to be brought home from a sailor's voyage at sea and given to the sailor's loved one or loved ones. Sailor valentines are typically octagonal, glass fronted, hinged wooden boxes ranging from 8" to 15" in width, displaying intricate symmetrical designs composed entirely of small sea shells of various colors glued onto a backing. Patterns often feature a centerpiece such as a compass rose or a heart design, hence the name, and in some cases the small shells are used to spell out a sentimental message.
      Although the name seems to suggest that the sailors themselves made these objects, a large number of them originated in the island of Barbados, which was an important seaport during this period. Historians believe that the women there made the valentines using local shells, or in some cases using shells imported from Indonesia, and then the finished products were sold to the sailors.
      In his book Sailors' Valentines, John Fondas concludes that the primary source for sailors' valentines was the New Curiosity Shop, located in McGregor Street, Bridgetown, Barbados, and a popular shop where sailors would purchase souvenirs. The shop was owned by the English brothers B.H. and George Belgrave. Fondas' research tells of a sailors' valentine reconstruction, during which the reconstructing artist found pieces of a Barbados newspaper inside the backing.
      Today, antique sailors' valentines are collectibles, valued for their beauty and unusual qualities. Collector interest has sparked a resurgence in sailors' valentines as an art form, and shell kits and patterns are now sold at craft shops. Many sailors' valentines, both new and old, can be found on Nantucket, Massachusetts. Wikipedia

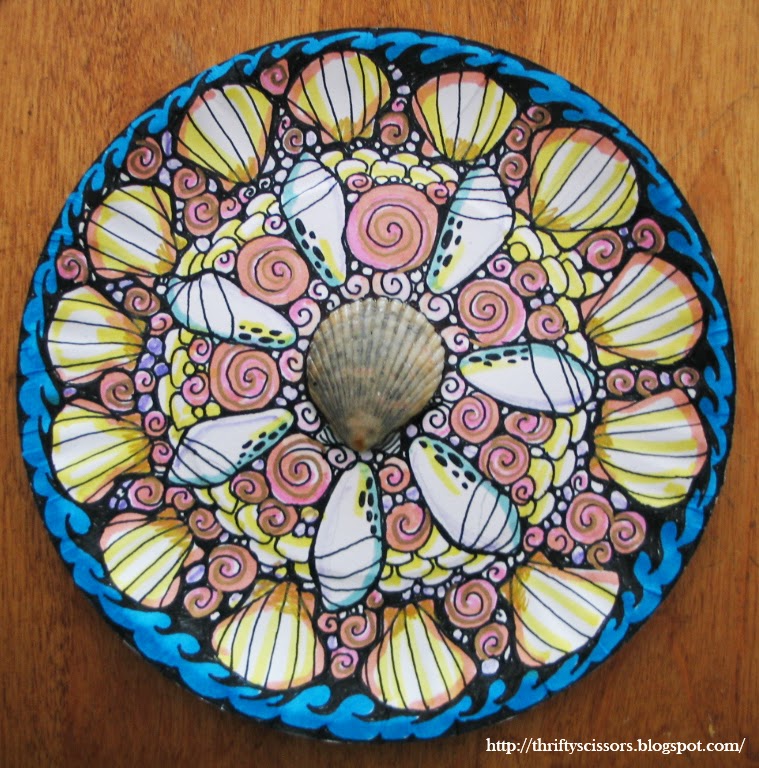
      I adapted this paper sailor's valentine project for very young students by printing small black and white shells in advance for them to cut, color and then glue down into a pattern of their own choosing during our craft time for next year. My budget is very limited; I estimate that I will spend approximately 5 cents per student on this craft by the time it is finished. Teachers may, of course, glue real seashells to heavy weight paper plate alternatives if they live in areas where seashells are free and plentiful. I will glue a handful of scallop shells that I collected during a beach vacation to the middle of each child's plate to give them something from the sea to touch and view.
      If your students are much older than my own, first, second, third or even fourth; you may teach a similar project using larger paper plates, more real shells and a chart displaying types of seashells. In fact, this would be a nice project to incorporate into a unit about sea life/ oceans in a regular classroom. My teacher's sample on this post was drawn free hand. Students in fourth grade would certainly be able to create this kind of "doodle" challenge without the aid of cut and pasted design elements.

Craft Supplies:
  • small white paper plates
  • one real scallop shell per project
  • tacky white glue
  • a variety of magic markers
  • sheet of black and white seashells and scissors for young students (optional and included below)
My teacher's sample Sailor's Valentine drawn in black and white prior to coloring.
Left, I pasted a scallop shell down with white tacky glue before drawing my seashell design. I've estimated that I will not have more than twenty children to teach this project to next year, so I have already completed this step in advance for my own resources. Center, I drew my shell design first in black ink. Right, I then used pastel colored magic markers to color the shell design.
A few close up shots of the completed paper Sailor's Valentines. I will staple a black ribbon to the back side of the paper plate in order to hang this project on the wall.
Small seashells for pattern making. I will print and cut these out in bulk for my preschool
students to paste into their Sailor's Valentines. Teachers may wish to do likewise for
their younger students.

Sunday, June 1, 2014

Octopus Clock Craft

My teacher's sample of the octopus clock made from a paper
plate, magic markers and a bit of industry. The long "hand"
of my clock is one of the octopus tentacles, the smaller
"hand" mimics a piece of kelp or coral. Please pin the
photos only not templates, so that folks will have
 a reason to pay us a visit!
      This little paper plate craft is so easy to assemble.  Simply print, cut and paste the octopus parts as they are seen below. I backed the "arms" of the clock with cardboard so that the project might be crafted with durability. Punch a hole in each clock arm piece and also in the center of the paper plate. I used the pointed tip of my scissors to make a hole in the plate. Then I inserted the brass brad through all three holes and bent back the prongs on the backside of the paper plate. Now my students will be able to spin the "arms" or "hands" of the clock to mimic those of a real clock.
      I have included two options for the project so that teachers may either use my own solution for the coloring of the project or give their students simpler unadorned versions so that they can come up with their own unique interpretations of this paper plate craft.

Craft Supplies:
  • large white paper plate
  • variety of magic markers 
  • printed template of octopus (blank or decorated)
  • white glue
  • scissors
  • hole punch
  • printed numbers 1-12
  • brass brad
The clock as it appeared in black and white before I colored it. I printed out the numbers 1-12 in
 a classic font and pasted these around the edges of the paper plate to mimic a real clock face.
Here are a few closeup shots of my paper octopus clock craft.
Make sure to click directly on to the templates in order to download the largest versions for printing.

More Octopus Crafts:
More Time Telling Crafts:

Author Cheryl Block discussing award-winning "You're Blushing,
 Little Octopus," a children's picture book with a heart-warming story
 based on science and packaged with a CD-ROm as entertaining
as it is educational.

Monday, February 10, 2014

Craft Three Age Appropriate Clover Mosaics for St. Patrick's Day

A Shamrock Mosaic Simple Enough for Children 3, 4 and 5 Years Old to Craft
A dried green pea mosaic craft easy enough for very young children to craft!
Supply List:
  • dried green peas
  • uncooked rice brown or white
  • white paper plates
  • white school glue
  • stencil
Directions:
  1. Teachers need to prepare the paper plates in advance. Draw and cut a shamrock stencil for this assignment. Cut it twice, once from scratch paper. Trace it onto the paper plate and cut out the second stencil. This second stencil will be easier to trace around quickly because it will include the contours of the paper plate. Now trace around it for however many paper plates you need in the classroom; one per student. Make sure you use a either a permanent ink marker or a pencil to do this so that the white glue will not cause the shamrock tracing to smear during the glueing process.
  2. Pour out an ample supply of dried green peas into a shallow tray for the little ones to pick from during the project. 
  3. Emphasize to them the importance in filling up their shamrock entirely with the green peas and white school glue. Have a sample their to show them how their completed shamrock should look. 
  4. On the second day, students may repeat the same process of gluing with white or brown rice, filling in the outside space surrounding the shamrock.
  5. This is a good opportunity for teachers to discuss positive and negative space concepts with their young students.
  6. Students may then paste a boarder of green peas around the ridge of the paper plate on the third day. By this time they should be less intimidated by the pasting process.
Simple Clover Mosaic Craft for First, Second, and Third Graders
This clover mosaic is a bit more complex; it is assembled using torn and shredded shapes of paper.
Above photos show parts of the St. Patrick's Day craft up close.
A photo of my intermediate level paper mosaic for 1rst -3rd grade.

Supply List:
  • brown, black, white, and several varieties of green construction paper
  • white glue
  • shamrock stencil (optional)
  • white lead pencils
Directions:
  1. Teachers should draw a simple clover on a chalk board or a white board demonstrating to his or her students what the parts of clover are.
  2. Give each students a large black sheet of construction paper and a white pencil or a white crayon to draw a similar clover leaf pattern onto their paper.
  3. Students may then tear the green papers and glue these pieces inside their clover leaf drawings. This part of the project may be further complicated if the teacher chooses to do so by using hand painted green papers to craft the purple clover leafs as I have done in the sample shown. Often times teachers choose to do this so that the assignment may be used to stretch over several days and including more processes in order to teach a combination of skills under the same assignment. If you want the assignment to be less complex, simply exclude this part of it and use plain green construction paper. However, do include a variety of greens so that the students may alternate the shades and craft an interesting abstract pattern.
  4. After completing the clover, students may then select background colors consisting of at the very least, two colors of construction paper. I used black and brown for my teacher's example. But students may wish to choose more vibrant colors than these.
  5. Next paste shredded lavender papers on top of each other to create delicate looking purple clover. I used a dark purple, and lighter purple and a white colored paper for this part of the assignment. Purple clover is very common to the State of Missouri where I live and so it is a natural selection of color for me to make for this mosaic. However, I could have chosen to use shades of grey for white clover blossoms if I had preferred them.
  6. After the pictures dry, teachers may then choose to have students cover their mosaics with Modge Podge in order to better preserve their work.
A Fun Recyclable Clover Mosaic for Fourth, Fifth and Sixth Graders
    Upper Left, The shredded purple papers for the purple clover flower buds. Lower Left,
    The hand cut shredded painted papers for the clover's foliage. Right, The layered shredded
    newsprint and shredded color paper mix for the first layer of the paper mosaic.


    The finished purple clover, paper mosaic for St. Patrick's Day. This paper mosaic is complex enough
    to hold the interests of fourth through sixth graders. It may also be challenging to students in middle school.
     
    Close up camera shots of the purple clover mosaic.

    Supply List:
    • newsprint
    • magazines
    • printed green papers
    • scissors
    • white glue
    Directions:
    1. This project provides the perfect opportunity to introduce your students to the concept of recycling discarded papers on order to create works of art. 
    2. The first layer of this St. Patrick's Day craft are made with shredded old newspapers and tossed construction paper scraps that have been cut into smaller pieces. 
    3. I have included detailed photos here of how paper may be shredded by hand to craft very detailed complex art work. Encourage your students to spend time doing this scissor work over several days. Give them zip lock plastic bags to keep their shredded paper in. 
    4. Students will need to cut green hearts in advance for clover leaves and shred tiny pieces of lavender paper to paste in lumps for the purple clover.
    5. As you may have guessed, they will need an ample supply of white glue or wheat paste if you prefer to mix this prior to their pasting together the layers. 
    6. The project is designed to take place over a few days of drying time between layers. However it is possible to do an entire mosaic over two hours with very little trouble. How much trouble will dependent  upon the student's age and dexterity, and also upon the size of the initial paper given for the "field" of clover. If you are concerned about time constraints, use 8 1/2 inch by 11 inch paper for the background. I choose to use large sheets of newsprint for my paper mosaic project.
    7. I also cut my clover leaves and green stems from painted papers in order to complicate the assignment for older students. They will need an extra day for painting papers with brayers and combs.
    8. Teachers may also use a paper shredder in order to speed up the art assignment for impatient participants. However, I applaud those students who are willing to develop the tenacity involved in manipulating their paper mosaics over several class periods. Certainly this should be encouraged with those students who are home schooled and have the opportunity to develop artwork over several days without time constraints.
    9. After the artwork has been completed, teachers may choose to have their students brush on a top layer of Modge Podge in order to preserve their creations from damage. This will definitely need to be done if these pictures are to be displayed in the school's hallways.
    Plant Long Held "Sacred"
    Clover, of Which the Shamrock is a Species, Was Much Thought Of by the Ancient Greeks

          It is difficult to say what was the original shamrock, trefoil or Hero Trinity. The leaf now recognized as the national emblem is that of the white clover, but the name shamrock is the generic and is applied also to the purple clover, the speedwell, the pimpernel and to the wood sorrel.
          The clover of two or four leaves was held sacred in the festivals of the Greeks. The one of four leaves, when carried about, is supposed to insure success at play and confer the power of detecting evil spirits. The lover may put it under his pillow and he will dream of his beloved, or the maiden may slip it into her sweetheart's show without his knowledge and it will insure his safe return from any journey. It may be employed to prevent the wearer's being drawn into military service, is said to be a cure for lunacy, and is still, among the Irish, regarded as magical, even sacred. Snakes dislike it exceedingly and will not remain where it is growing.
          Some say that four-leaf shamrock is the shamrock of luck, and others that it is the five-leaved one that holds the magic touch. This latter is rare and prized and is said to grown from a decaying body, as the nettle is said to spring from buried human remains. The shamrock of luck must be found "without searching, without seeking." When thus discovered it should be cherished and preserved as an invincible talisman. The Semi-Weekly Tribune, North Platte, Nebraska, 1918

    More Shamrock Crafts Just For Fun:

    Friday, November 1, 2013

    Craft a Funny Gobbler From Paper Plates

    This seated turkey craft is ready to hang. His tail feathers and body are held together and spin on a brass brad.
    Supply List For This Turkey:
    • a variety of magic markers
    • one black permanent ink marker
    • one printed copy of the turkey graphic below
    • two paper plates, one larger than the other 
    • one brass brad
          This funny paper plate craft is so easy to assemble after coloring the template and drawing "feathers" on to the perimeter of two paper plates. Just find the center of the paper plates and turkey graphic and then poke a brass brad through all three and clamp the elements together. Hang the gobbler up and spin him around to make him look dizzy!

    For best results print the turkey graphic out on heavy weight paper. Above you can see how he looks before attaching the tail feathers made from two paper plates.

    Download and print this funny gobbler graphic for your next Thanksgiving craft today.


    Something to Be Thankful For 
    by Clara J. Denton

    I'm glad that I am not to-day
    A chicken or a goose,
    Or any other sort of bird
    That is of any use.

    I'd rather be a little girl,
    Although 'tis very true,
    The things I do not like at all,
    I'm often made to do.

    I'd rather eat some turkey than
    To be one, thick and fat,
    And so, with all my heart, to-day,
    I'll thankful be for that!

    Monday, September 9, 2013

    Craft an Edible Jack-O-Lantern Bingo Game

          Students or teachers can draw a Jack-o-lantern on the inside of a paper plate with a black marker. Don't forget to give him a large toothy gin and number or letter each tooth as well. Color in the spooky pumpkin with bright orange and green markers. Then use candy corn to mark off the numbers or letters called randomly by the teacher. The first Jack-o-lantern to have his teeth restored is a bingo!

    More Edible Games for Kids:

    More Candy Corn Crafts:

    Friday, September 6, 2013

    Craft A Half-Eaten Home!

    Above is a perfectly sweet apple craft that teachers may hang any where inside the classroom to decorate for fall.
    Apple units are frequently taught to preschool through second grade in the United States during the months of September and October.
    This simple little apple craft is so easy to teach to young students. Every student should have the following supplies to complete it successfully:
    • white cotton balls
    • red, green and brown markers
    • two white paper plates
    • white glue
    • scissors
    • five green pom-poms 
    • one pair of googly eyes
    • one tiny red pom-pom for the worm's nose
    • a hole punch
    • a few black beans
    Directions: Step-by-Step
    1. Color the backsides of both white paper plates with a bright, ruby red marker.
    2. Cut from the center of one plate, a large or small hole.
    3. Paste onto the front white side of one paper plate, a cardboard stem and two leaves. These should be colored with markers before gluing onto the inside edge of the back plate.
    4. Paste on top of this first plate the second. Apply glue to the circumference of the entire edge of the back plate. Both of the red sides of the paper plates should be facing away from each other in order to create a three dimensional apple.
    5. Let the paper apples dry thoroughly.
    6. Glue soft cotton balls to the interior of your apple shape to represent the white insides of an apple. 
    7. Paste inside of the apple, a tiny, green pom-pom worm. 
    8. Glue on the worm's googly eyes and tiny red pom-pom nose.
    9. Glue a few little black bean inside the apple to represent 'seeds.'
    10. Punch out a hole at the top of your apple's stem so that you may hang your clever little 3D paper apple plate anywhere inside of the classroom.
    This is wormy apple craft includes soft, bumpy, and rough textures.

     Pat Jaswell of Jaswell Farms in Smithfield gives a lesson on apple picking to 27 children from Harrisville Preschool. The children and parents got to pick Macintosh apples, just ripe for picking at the 113-year-old farm on Swan Road. The farm orchard has 11 different kinds of apples and today they did their first pressing of apple cider.

    Wednesday, September 4, 2013

    Links to More Than 100 Apple Crafts!

    A worm, crafted from a paper chain, wiggles his way down the face of a vividly colored paper
     apple. With the combination of several ordinary tools plus materials found at any grocery or
    drug store, your child can craft fun and easy apple projects for fall displays and school
    assignments.

          Above is one of many paper apple crafts posted at Thrifty Scissors. Here I have combined several craft methods used by early learning teachers to develop the small motor skills of their young students. You will need the following supplies to make the apple craft shown above.
    • a large white paper plate
    • green, red, black and pink markers
    • a pale or lime green paper
    • goggle eyes
    • pinking shears 
    • regular scissors also
    • brown and green construction paper
    • white glue
    Directions for the paper chain worm:
    1. Students may cut strips of paper using the pinking shears. This will give their worms a ruffled look. The number of strips will determine the length of their worms. Of course, the more links they add to the worm, the more practice students get at manipulating paper. I made the above worm from small half inch wide strips and looped these together into a very tight chain fold because I liked the look. If your classroom glue is not very tacky, teachers may wish to ofter students transparent tape to hold the loops together.
    2. Students must loop and paste each link into the previous link in order to craft a continuous linked chain. 
    3. When they have completed their worms to the desired length, instruct them to cut out a small round head for each worm and glue on the goggle eyes. 
    4. Draw smiles on the worm faces and then paste the paper heads to the last link on each chain. 
    Directions for crafting the paper apple: 
    1. I suggest cutting apple shapes from a large white paper plates for this particular paper project. I could have used a red paper plates but this would have eliminated the coloring practice that my students needed. Some of you who are working with very young children may opt for this strategy. 
    2. Suggest the coloring of the white paper plate either red, green or yellow. Depending upon the personal preferences of each student.
    3. Then give each student brown and green scraps of construction paper to cut leaves and a stem for their paper apples. Attach these with school glue.
    4. Attach the paper chain worm with glue as well.
          Cutting, pasting, folding, coloring, and even twisting paper are the most popular and inexpensive practices included in this helpful listing for educators. Apple crafts and activities in during the Autumn months are quite common in classrooms all across the United States. 

    Crafting paper apples:
    1. Back to school apple trees
    2. Apple Print Wreath
    3. Apple Tree Sewing Cards
    4. Apple life cycle paper plate project
    5. Woven paper apples
    6. An apple newsprint banner
    7. A paper apple book (bottom of page)
    8. Candy apple craft with scripture
    9. Phonics apple craft
    10. Fall Apples and Johnny Appleseed (Math, Craft, and Literacy Fun by Robin Sellers)
    11. Coffee Filter Apples
    12. Paint an apple tree on a paper plate
    13. Little Apple Yarn Favors
    14. Apple tree craft with buttons, tissue paper and a paper towel roll
    15. Paper bag apple tree
    16. Handprint, footprint apple tree
    17. Easy construction paper apple tree craft
    18. Craft an Apple Lacing Card from A Paper Plate
    19. Baby shower with apple theme, cute craft ideas!
    20. String a wormy apple craft
    Crafting ceramic, clay and plastic apples:
    1. A bushel of apples to play with
    2. Plastic Bottle Apples
    3. Recycle clear, plastic lids into apples
    4. A clay and wire apple tree
    5. Salt dough apple wreath
    6. Attempting to throw an apple shaped pot on a wheel
    Sewing/Knitting apple crafts:
    1. Apple Knitting Pattern Tutorial
    2. Apple Hats!
    3. Apple Tea Cozy & Coasters
    4. Felt wool apple with removable slices
    5. Sample photos of felt apples from "Big Little Felt Universe"
    6. Japanese peal away felt apple
    7. Apple + Watermelon Gift Pouches
    8. Felt apple themed tea set for kiddos (pictures only)
    9. Pattern for felt apple bean bags
    10. Little Apple Yarn Favors
    11. How to make an apple pin cushion
    12. Apple embroidery hoop picture tutorial
    13. Apple Print Tee Shirts
    14. Quilted apple picture collage for school children (picture only)
    15. Sew the perfect apple pincushion
    16. The very complicated apple tree knit scarf
    17. Stamping with paint onto knit shirts
    18. Bushel of Apples Felt Garland
    1. Apple Unit (educational games)
    2. Apple games for early learners
    3. Free Apple Activities Pack
    4. Homeschool Share – Johnny Appleseed
    5. Homeschool Creations Apple Read Write Build
    6. Confessions of a Homeschooler – A is for Apple
    7. All Our Days Apple Packs
    8. Spell Out Loud – Apple Pattern Cards
    9. 1+1+1=1 – Apple Printables
    10. Four Seasons of an Apple Tree 
    11. Apple Scented Cloud Dough
    12. Apple pie scented play dough
    13. Apple roll and pick game
    Sweet Apple Deserts and Treats: 
    1. Warm Apples and Ice Cream
    2. Apple Tree Snack
    3. Apple Cupcakes with Caramel Buttercream
    4. Individual Apple Tarts
    5. How to make hot pink candy apples
    6. Apple cookies for the teacher and classmates on first day of school
    7. How to make perfect candy apples
    8. Tasty Apple Smiles by Pirate Lifestyle
    9. Spiced Apple Waffles
    10. Homemade Applesauce
    An Apple for The Teacher:
    1. Surprise your teacher with an edible chalkboard
    2. Teacher Appreciation - printable apple tags by Paula Biggs
    3. Printable thank you teacher gift tags with A+ apples - (pdf.)
    4. Printable Teacher Thank You Notes - from tip junkie
    5. Apple Tree Magnet Board - for cute little framed photos for her students...
    6. Draw a back to school stack of books and apple - for your teacher by Art for Kids Hub
    7. Give your teacher a wooden basket craft  - with chalk work apples and strawberries!
    8. Apple Gift Basket - idea by 30DAYS
    9. How to make a book page apple for your favorite teacher's desk...
    The Apple in Literature:
    1. "The Giving Tree'' - read aloud by Keith Carradine
    2. "Ten Red Apples," by Pat Hutchins
    3. ''Apple Trouble'' - read aloud by Ms. Michelle's Storytime
    4. "Oats and Wild Apples," by Frank Asch
    5. "Bad Apple'' a tale of friendship read aloud by KidTimeStoryTime and puppet friends 
    6. Who as Johnny Appleseed?
    Apple Facts:
    1. Apples: History & Nutrition
    2. The history of apples by Homeschool Arcade who, when, what, how...

    Monday, September 2, 2013

    Craft an Apple Lacing Card from A Paper Plate

    Lacing cards needn't be expensive; just make your own from durable paper plates!

          This apple themed lacing card is so easy to craft. The only supplies you will need: a durable paper plate, makers, some twine and a hole punch. Draw your apple outline onto the front side of your paper plate. Then punch holes around the apple and number each hole so that your child may use the activity as a counting exercise as well. Then color the apple bright red and the stem brown and the leaves a vivid green. Add a piece of twine that is long enough to string all of the way around the paper plate's circumference. I knotted a small plastic bead to one end of my twine and strung it through the first hole (1.)  Then I taped the twine firmly in place with a transparent tape so that it would be held in the proper position for stringing.

    Craft more lacing cards: