Saturday, September 7, 2013

Little Apple Rhymes and Poems

A Apple Pie.
B bit it.
C cut it.
D dealt it. 
E eat it.
F fought for it.
G got it. 
H hid it.
J joined it.
K kept it.
L longed for it.
M mourned for it.
N nodded at it. 
O opened it.
P peeped at it.
Q quartered it.
R ran for it.
S stole it.
T took it. 
V viewed it.
W wanted it.
X Y Z & 
Amperse and 
All wished for 
A piece in hand.


Apple Gathering by Georgina Rossetti
    I plucked pink blossoms from mine apple-tree
        And wore them all that evening in my hair:
    Then in due season when I went to see
            I found no apples there.

    With dangling basket all along the grass
        As I had come I went the selfsame track:
    My neighbours mocked me while they saw me pass
            So empty-handed back.

    Lilian and Lilias smiled in trudging by,
        Their heaped-up basket teased me like a jeer;
    Sweet-voiced they sang beneath the sunset sky,
            Their mother's home was near.

    Plump Gertrude passed me with her basket full,
        A stronger hand than hers helped it along;
    A voice talked with her through the shadows cool
            More sweet to me than song.

    Ah Willie, Willie, was my love less worth
        Than apples with their green leaves piled above?
    I counted rosiest apples on the earth
            Of far less worth than love.

    So once it was with me you stooped to talk
        Laughing and listening in this very lane:
    To think that by this way we used to walk
            We shall not walk again!

    I let my neighbours pass me, ones and twos
        And groups; the latest said the night grew chill,
    And hastened: but I loitered, while the dews
            Fell fast I loitered still.

Jesus Christ the Apple Tree, 1803
The tree of life my soul hath seen,
Laden with fruit, and always green;
The trees of nature fruitless be,
Compar'd with Christ the Appletree.

This beauty doth all things excel,
By faith I know, but ne'er can tell
The glory which I now can see,
In Jesus Christ the Appletree.

For happiness I long have sought,
And pleasure dearly I have bought;
I miss'd of all; but now I see
'Tis found in Christ the Appletree.

I'm weary'd with my former toil—
Here I will sit and rest awhile,
Under the shadow I will be,
Of Jesus Christ the Appletree.

With great delight I'll make my stay,
There's none shall fright my soul away;
Among the sons of men I see
There's none like Christ the Appletree.

I'll sit and eat this fruit divine,
It cheers my heart like spirit'al wine;
And now this fruit is sweet to me,
That grows on Christ the Appletree.

This fruit doth make my soul to thrive,
It keeps my dying faith alive;
Which makes my soul in haste to be
With Jesus Christ the Appletree.


Two Little Apples by Anonymous
Two little apples hanging on a tree,
Two little apples smiling at me.
I shook that tree as hard as I could.
Down came the apples, Mm! Mm! Good!

Friday, September 6, 2013

Craft A Half-Eaten Home!

Above is a perfectly sweet apple craft that teachers may hang any where inside the classroom to decorate for fall.
Apple units are frequently taught to preschool through second grade in the United States during the months of September and October.
This simple little apple craft is so easy to teach to young students. Every student should have the following supplies to complete it successfully:
  • white cotton balls
  • red, green and brown markers
  • two white paper plates
  • white glue
  • scissors
  • five green pom-poms 
  • one pair of googly eyes
  • one tiny red pom-pom for the worm's nose
  • a hole punch
  • a few black beans
Directions: Step-by-Step
  1. Color the backsides of both white paper plates with a bright, ruby red marker.
  2. Cut from the center of one plate, a large or small hole.
  3. Paste onto the front white side of one paper plate, a cardboard stem and two leaves. These should be colored with markers before gluing onto the inside edge of the back plate.
  4. Paste on top of this first plate the second. Apply glue to the circumference of the entire edge of the back plate. Both of the red sides of the paper plates should be facing away from each other in order to create a three dimensional apple.
  5. Let the paper apples dry thoroughly.
  6. Glue soft cotton balls to the interior of your apple shape to represent the white insides of an apple. 
  7. Paste inside of the apple, a tiny, green pom-pom worm. 
  8. Glue on the worm's googly eyes and tiny red pom-pom nose.
  9. Glue a few little black bean inside the apple to represent 'seeds.'
  10. Punch out a hole at the top of your apple's stem so that you may hang your clever little 3D paper apple plate anywhere inside of the classroom.
This is wormy apple craft includes soft, bumpy, and rough textures.

 Pat Jaswell of Jaswell Farms in Smithfield gives a lesson on apple picking to 27 children from Harrisville Preschool. The children and parents got to pick Macintosh apples, just ripe for picking at the 113-year-old farm on Swan Road. The farm orchard has 11 different kinds of apples and today they did their first pressing of apple cider.

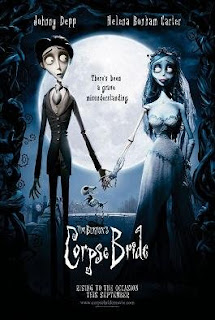
Corpse Bride

      "Corpse Bride", often referred as "Tim Burton's Corpse Bride", is a 2005 stop-motion-animated horror musical film directed by Tim Burton and Mike Johnson. The plot is set in a fictional Victorian era village in Europe. Johnny Depp led an all-star cast as the voice of Victor, while Helena Bonham Carter voiced Emily, the title character. Corpse Bride is the third stop-motion feature film produced by Burton and the first directed by him (the previous two films, The Nightmare Before Christmas and James and the Giant Peach, were directed by Henry Selick). This is also the first stop-motion feature from Burton that isn't distributed by Walt Disney Pictures.


      The film was nominated in the 78th Academy Awards for Best Animated Feature, but was beaten by Wallace & Gromit: The Curse of the Were-Rabbit, which also starred Helena Bonham Carter. It was shot with a battery of Canon EOS-1D Mark II digital SLRs, rather than the 35mm film cameras used for Burton's previous stop-motion film The Nightmare Before Christmas.
      In an unnamed Victorian Era European village, Victor Van Dort (Johnny Depp), the son of nouveau riche fish merchants, and Victoria Everglot (Emily Watson), the neglected daughter of hateful aristocrats, are getting prepared for their arranged marriage, which will raise the social class of Victor's parents and restore the wealth of Victoria's penniless family. Both have concerns about marrying someone they do not know, but they fall instantly in love when they first meet. After the shy, clumsy Victor ruins the wedding rehearsal and is scolded by Pastor Galswells (Christopher Lee), he flees and practices his wedding vows in the nearby forest, placing the wedding ring on a nearby upturned tree root.
Theatrical Release Poster.
      The root turns out to be the finger of a dead girl clad in a tattered bridal gown, who rises from the grave claiming that she is now Victor's wife. Spirited away to the surprisingly festive Land of the Dead, the bewildered Victor learns the story of Emily (Helena Bonham Carter), his new "bride," murdered years ago on the night of her secret elopement. Emily, as a wedding gift, reunites Victor with his long-dead dog, Scraps. Meanwhile, Victoria's parents hear that Victor has been seen in another woman's arms, and become suspicious.
      Wanting to reunite with Victoria, Victor tricks Emily into taking him back to the Land of the Living by pretending he wants her to meet his parents. She agrees to this and takes him to see Elder Gutknecht (Michael Gough), the kindly ruler of the underworld, to send him and Emily temporarily to the Land of the Living. Once back home, Victor asks Emily to wait in the forest while he rushes off to see Victoria and confess his wish to marry her as soon as possible, to which she gladly returns his feelings. Emily soon arrives and sees the two of them together and, feeling betrayed and hurt, drags Victor back to the Land of the Dead. Victoria tells her parents that Victor has been forcibly wed to a dead woman, but they believe she has lost her mind and lock her up in her bedroom. She escapes her room by window and rushes to Galswells to find a way helping Victor, but fails. With Victor gone, Victoria's parents decide to marry her off to a presumably wealthy newcomer in town named Lord Barkis Bittern (Richard E. Grant), who appeared at the wedding rehearsal, against her will.
      Emily is heartbroken by Victor's deception. Victor, however, apologizes for lying to her, and the two reconcile while playing the piano together. Shortly after, Victor's family coachman appears in the afterlife (having recently died) and informs Victor of Victoria's impending marriage to Lord Barkis. At the same time, Emily learns from Elder Gutknecht that because marriage vows are only binding until "death do you part" and death already parts them, her supposed marriage to Victor was never valid. In order for their marriage to become valid, Victor must repeat his vows in the Land of the Living and willingly drink poison - thus joining her in death. Overhearing this, and fretting about having lost his chance with Victoria, Victor agrees to die for Emily. All of the dead go "upstairs" to the Land of the Living to perform the wedding ceremony for Victor and Emily. Upon their arrival, the town erupts into a temporary panic until every living person recognizes each others' loved ones from the dead and they have a joyous reunion under the bizarre circumstances.
     After a quarrel with Lord Barkis - and realizing he was only after her supposed money - Victoria follows the procession of dead to the church. As Victor prepares to drink the cup of poison to kill himself, Emily notices Victoria and has second thoughts, realizing that she is denying Victoria her chance at happiness the same way it was stolen from her. Lord Barkis interrupts them, and Emily recognizes him as her former fiance - who is revealed to be the one who murdered her for her dowry. Lord Barkis tries to kidnap Victoria at sword point, but Victor stops him and the two men duel. Emily intercedes to save Victor, and Lord Barkis mockingly proposes a toast to Emily claiming she's "always the bridesmaid, never the bride!", and accidentally drinking the cup of poison. The dead (now able to intercede as he's dead) drag the "new arrival" away for punishment.
      Emily sets Victor free of his vow to marry her, giving the wedding ring back to Victor and her wedding bouquet to Victoria before exiting the church. As she steps into the moonlight, she transforms into hundreds of butterflies, presumably finding peace, as Victor and Victoria look on.

More Related Content:

The Story of "Stingy Jack"

      Stingy Jack, perhaps also known as Jack the Smith, Drunk Jack, and Jack of the Lantern, is a mythical character apparently associated with All Hallows Eve. It is common lore that the "jack-o'-lantern" is derived from the character.
      As the story goes, several centuries ago amongst the myriad of towns and villages in Ireland, there lived a drunkard known as "Stingy Jack". Jack was known throughout the land as a deceiver, manipulator and otherwise dreg of society. On a fateful night, the devil overheard the tale of Jack's evil deeds and silver tongue. Unconvinced (and envious) of the rumors, the devil went to find out for himself whether or not Jack lived up to his vile reputation.
      Typical of Jack, he was drunk and wandering through the countryside at night when he came upon a body on his cobblestone path. The body with an eerie grimace on its face turned out to be the Devil. Jack realized somberly this was his end; the devil had finally come to collect his malevolent soul. Jack made a last request: he asked the devil to let him drink ale before he departed to hell. Finding no reason not to acquiesce the request, the devil took Jack to the local pub and supplied him with many alcoholic beverages. Upon quenching his thirst, Jack asked the devil to pay the tab on the ale, to the devil's surprise. Jack convinced the devil to metamorphose into a silver coin with which to pay the bartender (impressed upon by Jack's unyielding nefarious tactics). Shrewdly, Jack stuck the now transmogrified devil (coin) into his pocket, which also contained a crucifix. The crucifix's presence prevented the devil from escaping his form. This coerced the devil to agree to Jack's demand: in exchange for the devil's freedom, the devil had to spare Jack's soul for 10 years.
New York Tribune, 1915.
      Ten years later to the date when Jack originally struck his deal, he found himself once again in the devil's presence. Same as the setting before, Jack happened upon the devil and seemingly accepted it was his time to go to hell for good. As the devil prepared to take him to the underworld, Jack asked if he could have one apple to feed his starving belly. Foolishly the devil once again agreed to this request. As the devil climbed up the branches of a nearby apple tree, Jack surrounded its base with crucifixes. The devil, frustrated at the fact that he been entrapped again, demanded his release. As Jack did before, he made a demand: that his soul never be taken by the devil into hell. The devil agreed and was set free.
       Eventually the drinking and unstable lifestyle took its toll on Jack; he died the way he lived. As Jack's soul prepared to enter heaven through the gates of St. Peter he was stopped. Jack was told that because of his sinful lifestyle of deceitfulness and drinking, he was not allowed into heaven. The dreary Jack went before the Gates of Hell and begged for commission into underworld. The devil, fulfilling his obligation to Jack, could not take his soul. To warn others, he gave Jack an ember, marking him a denizen of the netherworld. From that day on until eternity's end, Jack is doomed to roam the world between the planes of good and evil, with only an ember inside a hollowed turnip ("turnip" actually referring to a large swede) to light his way.

More Related Content:

Arsenic and Old Lace

      "Arsenic and Old Lace" is a 1944 film directed by Frank Capra based on Joseph Kesselring's play of the same name. The script adaptation was by twins Julius J. Epstein and Philip G. Epstein. Capra actually filmed the movie in 1941, but it was not released until 1944, after the original stage version had finished its run on Broadway. The lead role of Mortimer Brewster was originally intended for Bob Hope, but he couldn't be released from his contract with Paramount.
      Capra had also approached Jack Benny and Ronald Reagan before going with Cary Grant. Boris Karloff played Jonathan Brewster, who "looks like Karloff", on the Broadway stage, but he was unable to do the movie as well because he was still appearing in the play during filming, and Raymond Massey took his place.
      In addition to Grant as Mortimer Brewster, the film also starred Josephine Hull and Jean Adair as the Brewster sisters, Abby and Martha, respectively. Hull and Adair as well as John Alexander (who played Teddy Roosevelt) were reprising their roles from the 1941 stage production. Hull and Adair both received an eight-week leave of absence from the stage production that was still running, but Karloff did not as he was an investor in the stage production and its main draw. The entire film was shot within those eight weeks. The film cost just over $1.2 million of a $2 million budget to produce.
Despite having written several books describing marriage as an "old-fashioned superstition", Mortimer Brewster (Cary Grant) falls in love with Elaine Harper (Priscilla Lane), who grew up next door to him in Brooklyn, and, on Halloween day, they marry. Immediately after the wedding, Mortimer visits the eccentric but lovable relatives who raised him and who still live in his old family home: his elderly aunts Abby (Josephine Hull) and Martha (Jean Adair), and his brother Teddy (John Alexander), who believes he is Theodore Roosevelt. Each time Teddy goes upstairs, he yells "Charge!" and takes the stairs at a run, imitating Roosevelt's famous charge up San Juan Hill.
Theatrical release poster
      Mortimer finds a corpse hidden in a window seat and assumes that Teddy has committed murder under some delusion, but his aunts explain that they are responsible ("It's one of our charities"). They explain in the most innocent terms that they have developed what Mortimer calls the "very bad habit" of ending the presumed suffering of lonely old bachelors by serving them elderberry wine spiked with arsenic, strychnine and "just a pinch of cyanide". The bodies are buried in the basement by Teddy, who believes he is digging locks for the Panama Canal and burying yellow fever victims.
      To complicate matters further, Mortimer's brother Jonathan (Raymond Massey) arrives with his alcoholic accomplice, plastic surgeon Dr. Herman Einstein (Peter Lorre). Jonathan is a murderer trying to escape the police and find a place to dispose of the corpse of his latest victim, a certain Mr. Spenalzo. Jonathan's face, as altered by Einstein while drunk, looks like Boris Karloff's in his makeup as Frankenstein's monster. This resemblance is frequently noted, much to Jonathan's annoyance. Jonathan, upon finding out his aunts' secret, decides to bury Spenalzo in the cellar (to which Abby and Martha object vehemently, because their victims were all nice gentlemen while Mr. Spenalzo is a stranger and a "foreigner") and soon declares his intention to kill Mortimer.
      While Elaine waits at her family home next door for Mortimer to take her on their honeymoon, Mortimer makes increasingly frantic attempts to stay on top of the situation, including multiple efforts to alert the bumbling local cops to the threat Jonathan poses, as well as to get the paperwork filed that will have Teddy declared legally insane and committed to a mental asylum (giving him a safe explanation for the bodies should the cops find them, and preventing his aunts from creating any more victims because they will no longer have any place to bury the bodies). He also worries that he will go insane like the rest of the Brewster family. As he puts it, "Insanity runs in my family, practically gallops!" While explaining this to Elaine, he claims they've been crazy since the first Brewsters came to America as pilgrims.
      But eventually Jonathan is arrested, while Teddy is safely consigned to an asylum and the two aunts insist upon joining him. Finally, Abby and Martha inform Mortimer that he is not biologically related to the Brewsters after all: his real mother was the aunts' cook and his father had been a chef on a steamship. In the film's closing scene, after lustily kissing Elaine and before whisking her away to their honeymoon, he gleefully exclaims "I'm not a Brewster, I'm a son of a sea cook!" This is a Hollywood Production Code bowdlerization of the line in the play: "I'm a b*****d!"


More Related Content:

Costumes Worn On Halloween

      Halloween costumes are costumes worn on or around Halloween, a festival which falls on October 31. The Halloween costume has a relatively short history. Wearing costumes has long been associated with other holidays around the time of Halloween, even Christmas. Among the earliest references to wearing costumes at Halloween is in 1895, where "guisers" are recorded in Scotland, but there is almost no mention of a costume in England, Ireland, or the United States until 1900. Early costumes emphasized the pagan and gothic nature of the holiday, but by the 1930s costumes based on characters in mass media such as film, literature, and radio were popular. Halloween was originally promoted as a children's holiday, and as a means of reining in the wicked and destructive behavior of teenagers. Early Halloween costumes were aimed at children in particular, but after the mid-20th century, as Halloween increasingly came to be celebrated by adults, the Halloween costume was worn by adults as much as children.
      Although Halloween is often claimed to be a cultural descendant of the Celtic festival of Samhain, such claims are generally not considered either historically accurate or scholarly. In particular, the custom of dressing up in costumes and going "guising" or trick-or-treating at Halloween developed from Christian customs created in Western Europe around the 15th century. Guising at Halloween in Scotland is recorded in 1895, where masqueraders in disguise carrying lanterns made out of scooped out turnips, visit homes to be rewarded with cakes, fruit and money. The practice of Guising at Halloween in North America is first recorded in 1911, where a newspaper in Kingston, Ontario reported children going "guising" around the neighborhood.
      The holidays of All Saints' Day and All Souls' Day were often celebrated with costume parades, wild parties, and licentiousness of all sorts. In the 18th century in the United Kingdom, Halloween was celebrated in rural areas by farmers as a fertility rite, while in cities it had a Carnival-like atmosphere. But as Halloween was transported to the United States by waves of European immigrants, the licentious and rowdy elements of Halloween were domesticated to conform with the emerging Victorian era morality. Halloween was made into a private rather than public holiday, celebrations involving liquor and sensuality de-emphasized, and only children were expected to celebrate the festival.

These little ones are dressing in costume for All Saints Day at their private Catholic school. This costume celebration is fast becoming a popular alternative to traditional Trick-or-Treating. This is in part because of the current trends towards gore and inappropriate adult content surrounding the secular culture of Halloween. Guising on All Saint's Day also emphasizes the imitation of positive, historical characters throughout Christian church history.

      While wearing costumes at Halloween is recorded in Scotland in 1895, there is little evidence of costumes in England, Ireland, or the United States prior to 1900, however. Early Halloween costumes emphasized the pagan and gothic nature of Halloween, and were aimed primarily at children. Costumes were also made at home, or using items (such as make-up) which could be purchased and utilized to create a costume. But in the 1930s, A.S. Fishbach, Ben Cooper, Inc., and other firms began mass-producing Halloween costumes for sale in stores as trick-or-treating became popular in North America.
      Halloween costumes in popular culture are often designed to imitate supernatural and scary beings. Costumes are traditionally those of monsters such as vampires, werewolves, zombies, ghosts, skeletons, witches, goblins, trolls, devils, etc. or in more recent years such science fiction-inspired characters as aliens and superheroes. There are also costumes of pop culture figures like presidents, athletes, celebrities, or characters in film, television, literature, etc. Another popular trend is for women (and in some cases, men) to use Halloween as an excuse to wear sexy or revealing costumes, showing off more skin than would be socially acceptable otherwise. Young girls also often dress as entirely non-scary characters at Halloween, including princesses, fairies, angels, farm animals and flowers.
      Halloween costume parties generally fall on or around October 31, often falling on the Friday or Saturday prior to Halloween. The wearing of costumes for the purpose of "Trick-or-Treating" or guising, is traditionally done on the eve of Halloween and the tradition of wearing costumes for All Saint's Day generally is done either on All Saint's Day or on a school day that has been chosen for that purpose in parochial schools.

Improvised Masquerade Costumes

A tiny belle of 1830.
      With so many children, the idea of "dressing up" even of having or of going to a masquerade party, is likely to be a thing of shot notice. Often the jolliest parties of all are those got upon a day's notice.
      The costume part of the program is, of course, the most delightful part of it--unless you don't happen to have one, or find, to your dismay, that you've outgrown yours. If there is plenty of time, there is no trouble, but many a youngster has cried herself to sleep over having to decline an invitation to a Halloween party because the necessary costume was lacking.
      For that matter, a creditable costume can be improvised out of material at hand, and the youngster sent away, happy in her disquise.
      Her older sister's red party cloak, with its full hood pulled down over her face turns her into a quaint Little Red Riding-Hood as ever graced the pages of a beloved old fairy-tale book. Give her a little arm, apparently filled with the goodies she was to take to her grandmother when she set out upon that memorable walk. If the party chances to be a birthday party, the basket may contain real goodies, to be presented to the little hostess.
With A Kimono and Sash
      A fascinating Pierrot costume may be made of the small boy's white pajamas, if you sew great fluffy choux of scarlet or of blue or yellow mosquito netting (or the finer net) down the front. Make a "sugar-loaf cap," stuff it full of tissue paper, so that it will keep its shape, and sew another ruff upon the tip end of it. If you've time sew bands of color about the sleeves and trousers and the funny loose jacket.
Turned into a Japanese
Maiden
      With a figured kimono and a sash, and attractive little Japanese lady may be evolved in short order. If the kimono is her own, so much the better; if it's a grown-up kimono, turn up the hem until it is the right length, and baste the new hem in place over a wadding of cotton. Treat the sleeves in the same way. The body part may be drawn in as you please under the "obi," which is nothing in the world but her own sash tied in Japanese fashion. Twist her curls high on her head and stick through them tiny Japanese fans, or the tiny lanterns made to dangle at the end of a long stick. let her carry a folding fan, of course.
      For a very tiny boy, a pretty variation of the Pierrot costume consists of a funny, full affair, all in one piece-sleeves and trouser-legs as funny and full as the rest, but gathered in at wrists and ankles by hands and bows of bright ribbon. Big stars, cut from paper the color of the ribbon, are pasted onto the costume. 
To Make The Pierrot Buff
      The famous Pierrot's ruff is made of netting cut about twelve inches wide and gathered in the center. Make it as full as you can, pushing the gathers together until they are tight upon the thread. Then the ruff becomes as fluffy a thing as you want.
      A short red or yellow skirt, with a bolero borrowed from your store, will be needed to make your gipsy costume. If you've a scarf (those gay, embroidered piano scarfs are splendid for the purpose and a Roman sash is most effective), tie it around her waist, pulling it a little low and knotting the ends at the left side in front. Heap all the strings of beads and bracelets you can upon her, and if you've a bright silk handkerchief, cover her hair with it. The best way to do that is to lay it on flat, turning back the hem a couple of inches or so across her forehead and fastening at each side with a big round broach.
A gypsy, Little Red Riding Hood and a Quaint
little Quaker Lady
      For a little Irish lass a skirt of bright green with a full white blouse, open at the throat in a sort of V, may be run up in a little while. Tie a red bandana about her waist, and another about the throat, fasenting the knot to the end of the V.
      The "Old Virginia girl" and 1830 costumes are easily made of flowered cretonnes or of the crepe papers that come in such variety.
      Those crepe papers by the way make stunning costumes if you've time to devote the best part of a day to the making. The prettiest flower costumes topped off with a big flower for a hat; Mother Goose and her tribe of nursery fold: night and morning and twilight; witches and elves: children of other nations--there is no end to the costumes which can be made of them. If you make the paper costume upon a foundation of muslin, or. at least sew it upon a belt of strong muslin, with bands outlining the neck and ending the sleeves, there's little danger of the dress sagging or worse still, of pulling apart.

More Related Content:

Thursday, September 5, 2013

All 'descendants' of Johnny Appleseed

      This is Miss Isabel Million of Knoxville, Tenn., April 15, 1917, who invented the dolls with the dried apple faces. She carves the face in an apple which is then dried and preserved by a secret process, so that all the lines of the human face become as real as they are on her models.
      Left, Harve Hawkins and his old woman, Sairy Ann. He's the county's best known 'tater and melon fancier, and his income is pieced by Sairy Ann's quilting efficiency. Middle, Tobe Lemmons, of Smoky Cove, is "just po' white trash, with a misery in his chist which prevents him from making an honest living--just strong enough to peddle licker. Right, Old Poke Crouch of Greasy Cove, and his woman Cordie. They spend their time raising hawgs and orphans. Poke's official calling is that of a shoemaker, while Cordie is rated the *demon matchmaker of the the township.
      Left, Rhody Guinn, who makes rag carpets, lye soap and gathers *"yarbs" for a living. She is saving up to buy *"store teeth." Middle, Laviney Rupe of Turkey Egg Cove. Note, please, her crafty expression--acquired from being ceaselessly on the lookout for revenue officers. Viney's old man is a * moonshiner. Right, Miss Susie Adams, the village seamstress, caught on her way to the First Presbyterian Church. She hasn't missed a Sunday, nor a funeral, in forty years.
      Where the apple-doll models live. These cabin quarters on the right form the domicile of the real Harve Hawkins, whose daughter and granddaughter are seen in the midst of their week's wash. Photos and comments New York Tribune

* A "yarb" apparently was some variety of plant collected to make "home remedy" for cures. (medicinal purposes)
* A demon matchmaker forcasted love by witchcraft?
* Store teeth is a reference to dentures.  
*  A Moonshiner is a reference to one who makes Moonshine, white lightning, mountain dew, hooch, and Tennessee white whiskey are terms used to describe high-proof distilled spirits, generally produced illicitly. The word "moonshine" is believed to derive from the term "moonrakers" used for early English smugglers and the clandestine (i.e., by the light of the moon) nature of the operations of illegal Appalachian distillers who produced and distributed whiskey. Read more...

Wednesday, September 4, 2013

Links to More Than 100 Apple Crafts!

A worm, crafted from a paper chain, wiggles his way down the face of a vividly colored paper
 apple. With the combination of several ordinary tools plus materials found at any grocery or
drug store, your child can craft fun and easy apple projects for fall displays and school
assignments.

      Above is one of many paper apple crafts posted at Thrifty Scissors. Here I have combined several craft methods used by early learning teachers to develop the small motor skills of their young students. You will need the following supplies to make the apple craft shown above.
  • a large white paper plate
  • green, red, black and pink markers
  • a pale or lime green paper
  • goggle eyes
  • pinking shears 
  • regular scissors also
  • brown and green construction paper
  • white glue
Directions for the paper chain worm:
  1. Students may cut strips of paper using the pinking shears. This will give their worms a ruffled look. The number of strips will determine the length of their worms. Of course, the more links they add to the worm, the more practice students get at manipulating paper. I made the above worm from small half inch wide strips and looped these together into a very tight chain fold because I liked the look. If your classroom glue is not very tacky, teachers may wish to ofter students transparent tape to hold the loops together.
  2. Students must loop and paste each link into the previous link in order to craft a continuous linked chain. 
  3. When they have completed their worms to the desired length, instruct them to cut out a small round head for each worm and glue on the goggle eyes. 
  4. Draw smiles on the worm faces and then paste the paper heads to the last link on each chain. 
Directions for crafting the paper apple: 
  1. I suggest cutting apple shapes from a large white paper plates for this particular paper project. I could have used a red paper plates but this would have eliminated the coloring practice that my students needed. Some of you who are working with very young children may opt for this strategy. 
  2. Suggest the coloring of the white paper plate either red, green or yellow. Depending upon the personal preferences of each student.
  3. Then give each student brown and green scraps of construction paper to cut leaves and a stem for their paper apples. Attach these with school glue.
  4. Attach the paper chain worm with glue as well.
      Cutting, pasting, folding, coloring, and even twisting paper are the most popular and inexpensive practices included in this helpful listing for educators. Apple crafts and activities in during the Autumn months are quite common in classrooms all across the United States. 

Crafting paper apples:
  1. Back to school apple trees
  2. Apple Print Wreath
  3. Apple Tree Sewing Cards
  4. Apple life cycle paper plate project
  5. Woven paper apples
  6. An apple newsprint banner
  7. A paper apple book (bottom of page)
  8. Candy apple craft with scripture
  9. Phonics apple craft
  10. Fall Apples and Johnny Appleseed (Math, Craft, and Literacy Fun by Robin Sellers)
  11. Coffee Filter Apples
  12. Paint an apple tree on a paper plate
  13. Little Apple Yarn Favors
  14. Apple tree craft with buttons, tissue paper and a paper towel roll
  15. Paper bag apple tree
  16. Handprint, footprint apple tree
  17. Easy construction paper apple tree craft
  18. Craft an Apple Lacing Card from A Paper Plate
  19. Baby shower with apple theme, cute craft ideas!
  20. String a wormy apple craft
Crafting ceramic, clay and plastic apples:
  1. A bushel of apples to play with
  2. Plastic Bottle Apples
  3. Recycle clear, plastic lids into apples
  4. A clay and wire apple tree
  5. Salt dough apple wreath
  6. Attempting to throw an apple shaped pot on a wheel
Sewing/Knitting apple crafts:
  1. Apple Knitting Pattern Tutorial
  2. Apple Hats!
  3. Apple Tea Cozy & Coasters
  4. Felt wool apple with removable slices
  5. Sample photos of felt apples from "Big Little Felt Universe"
  6. Japanese peal away felt apple
  7. Apple + Watermelon Gift Pouches
  8. Felt apple themed tea set for kiddos (pictures only)
  9. Pattern for felt apple bean bags
  10. Little Apple Yarn Favors
  11. How to make an apple pin cushion
  12. Apple embroidery hoop picture tutorial
  13. Apple Print Tee Shirts
  14. Quilted apple picture collage for school children (picture only)
  15. Sew the perfect apple pincushion
  16. The very complicated apple tree knit scarf
  17. Stamping with paint onto knit shirts
  18. Bushel of Apples Felt Garland
  1. Apple Unit (educational games)
  2. Apple games for early learners
  3. Free Apple Activities Pack
  4. Homeschool Share – Johnny Appleseed
  5. Homeschool Creations Apple Read Write Build
  6. Confessions of a Homeschooler – A is for Apple
  7. All Our Days Apple Packs
  8. Spell Out Loud – Apple Pattern Cards
  9. 1+1+1=1 – Apple Printables
  10. Four Seasons of an Apple Tree 
  11. Apple Scented Cloud Dough
  12. Apple pie scented play dough
  13. Apple roll and pick game
Sweet Apple Deserts and Treats: 
  1. Warm Apples and Ice Cream
  2. Apple Tree Snack
  3. Apple Cupcakes with Caramel Buttercream
  4. Individual Apple Tarts
  5. How to make hot pink candy apples
  6. Apple cookies for the teacher and classmates on first day of school
  7. How to make perfect candy apples
  8. Tasty Apple Smiles by Pirate Lifestyle
  9. Spiced Apple Waffles
  10. Homemade Applesauce
An Apple for The Teacher:
  1. Surprise your teacher with an edible chalkboard
  2. Teacher Appreciation - printable apple tags by Paula Biggs
  3. Printable thank you teacher gift tags with A+ apples - (pdf.)
  4. Printable Teacher Thank You Notes - from tip junkie
  5. Apple Tree Magnet Board - for cute little framed photos for her students...
  6. Draw a back to school stack of books and apple - for your teacher by Art for Kids Hub
  7. Give your teacher a wooden basket craft  - with chalk work apples and strawberries!
  8. Apple Gift Basket - idea by 30DAYS
  9. How to make a book page apple for your favorite teacher's desk...
The Apple in Literature:
  1. "The Giving Tree'' - read aloud by Keith Carradine
  2. "Ten Red Apples," by Pat Hutchins
  3. ''Apple Trouble'' - read aloud by Ms. Michelle's Storytime
  4. "Oats and Wild Apples," by Frank Asch
  5. "Bad Apple'' a tale of friendship read aloud by KidTimeStoryTime and puppet friends 
  6. Who as Johnny Appleseed?
Apple Facts:
  1. Apples: History & Nutrition
  2. The history of apples by Homeschool Arcade who, when, what, how...

Monday, September 2, 2013

Craft an Apple Lacing Card from A Paper Plate

Lacing cards needn't be expensive; just make your own from durable paper plates!

      This apple themed lacing card is so easy to craft. The only supplies you will need: a durable paper plate, makers, some twine and a hole punch. Draw your apple outline onto the front side of your paper plate. Then punch holes around the apple and number each hole so that your child may use the activity as a counting exercise as well. Then color the apple bright red and the stem brown and the leaves a vivid green. Add a piece of twine that is long enough to string all of the way around the paper plate's circumference. I knotted a small plastic bead to one end of my twine and strung it through the first hole (1.)  Then I taped the twine firmly in place with a transparent tape so that it would be held in the proper position for stringing.

Craft more lacing cards:

String a Wormy Apple Craft

String a wormy apple.
      This little wormy apple is made with just a few simple materials you can purchase from a local grocery store. Here is a supply list:
  • small, durable paper bowls
  • red tissue paper
  • green and brown construction paper
  • a black marker
  • a shoe string (preferably white)
  • white glue
  • tape
  • scissors
  • one box of Kellogg's Froot Loops
Step-by-Step Directions:
  1. With the pointed end of your scissors, punch a whole in the bottom of the paper bowl that is just big enough to push the end of your shoe string through to the backside of the bowl. Tape this end firmly to the back side so that your shoe string is permanently attached to the bowl. 
  2. Draw and color in a few tiny apple seeds on the inside bottom of your bowl. This will represent the core of your apple. 
  3. Now the bowl is ready for a small student to decorate with tissue and construction paper. At this point you could have your student(s) paint the bowl instead. I have chosen to use a layered torn paper method for the project in order to avoid the accidental consumption of paint. However there are many non-toxic and even edible paints on the market today that teachers could use alternatively for the craft project here without worry. The bowl is not intended for liquids to be poured into it; but the cereal worm might get a little paint on it before your student(s) ingest that part of their craft.
  4. Layer red tissue with white school glue just around the edge of the bowl approximately one inch down the sides in order to suggest a bright red apple. 
  5. Then cut and paste a simple stem and two leaves to the top half of your apple bowl to further suggest the apple's realistic appearance. 
  6. Now empty the Kellogg's Froot Loops into a large bowl and place it in the center of your cleaned work table. Make sure the bowls have dried over night and that your students have very clean hands while they string their cereal worms.
  7. Be prepared for much of the cereal to disappear into little hungry mouths! Knot the end of their worms and send the craft home. 
On the far left, you can see how the shoe string looks when it has been poked through the backside of the paper bowl.
Center is a picture of the paper apple bowl before a student has strung their cereal worm. On the far right, is a picture
of the shoe string as it looks unraveled and ready for stringing.
Stringing small objects like Froot Loops or Cherrios can help
develop your child's small motor skills.
Because this craft activity is edible, teachers may wish to string
 cereal worms during snack time at their preschool or kindergarten.

Sunday, September 1, 2013

B is For Button and Also CORE

      As you can see, early learners do practice following instructions and manipulating materials by large degrees of difference. On the far left, this student is just beginning to learn how to hold a small tool; dipping a Q-tip into glue and pasting down the tiny buttons presented a real challenge to him. The middle student filled his entire paper with the tiny buttons with both the confidence and delight of child with advanced motor skills. The student on the far right, however, is completing the project by the most advanced literacy means. 
      It is clear that she understood her teacher's vocabulary and directions because the students were asked to glue the buttons inside the shape of the letter only. This direction was not given in order to establish an aesthetic interpretation of art, but to determine if the young students understood the concept of "inside" a letter shape versus the "outside" of a letter's shape. Establishing the visual boundaries of the alphabet is one of the primary literacy skills taught to early learners. 
      Often parents and some teachers mistake the agenda of art activities in preschool.  They believe that their child is being judged by standards of personal taste, when in fact they are not being assessed by cultural aesthetic preferences at all. Art serves a wide variety of purpose in schools and should never be interpreted by agenda that is superimposed by outside observation. Parents can learn so much about "how" their child is learning concepts just by asking the teacher a few key questions:
  • Is it important that my child colors in the lines? If so, why? 
  • Is this exercise teaching more than motor skill?
  • How is art used to teach my child literacy?
      It is also important for parents to know that at the early stages of development, there are no absolute wrongs in the manipulation of art activities. The students are just beginning to explore and learn with the materials. They are also spending much of their time learning how to listen to language and how to follow directions and what words mean. This takes time and patience on the part of adults. Do not openly judge your child's work with phrases like, "Oh look her work is so much better than his" or "I guess little Johnny just isn't as good as Alex in art." Your child can hear you make these kinds of judgements and develop an idea about his own competency far too early in his own life experiences. Try to involve yourself in his explorations with an open mind to possible discovery. Wait to verbalize any opinions. Sometimes just describing the activity is enough with phrases like: "Wow, you smeared a lot of blue paint!" or "It must be fun to glue pasta onto paper, I thought is was only for eating!"
       Our students range from ages 3 to 5 in the early learning center. At this stage of their development, they are learning preliteracy skills. There are literally hundreds of methods and means to use when teaching preliteracy skills to very young students. I will share as many of these in my ABC Daily journal as I am able to note during my teaching experiences at the school. A few of these activities are precursors to CORE standards adopted by my home state of Missouri. The CORE standards begin at Kindergarten, not preschool. However, preschool curriculum can be designed to compliment CORE initiatives. I have listed below the few kindergarten standards addressed by the activity we completed with the letter B last week.

Reading: Foundational Skills - Print Concepts:
CCSS.ELA-Literacy.RF.K.1d Recognize and name all upper- and lowercase letters of the alphabet.

Speaking & Listening - Presentation of Knowledge and Ideas:
CCSS.ELA-Literacy.SL.K.4 Describe familiar people, places, things, and events and, with prompting and support, provide additional detail.
CCSS.ELA-Literacy.SL.K.5 Add drawings or other visual displays to descriptions as desired to provide additional detail.

Below are the agenda covered by the lead teacher during this simple preliteracy lesson:
  • The teacher introduced the letter B to her students.
  • Students repeated the sound of the letter after hearing their teacher make the sound herself.
  • The teacher discussed the shape of B with the students.
  • The teacher then asked the students what familiar things started with the letter B.
  • The word button was introduced as beginning with the sound and the literal letter B.
  • The teacher then showed her students a printed sheet with a capital letter B
  • Students were instructed to glue buttons inside the letter B using a Q-tip, white school glue and a wide variety of colored plastic buttons.
Common Core State Standards listed above © Copyright 2010. National Governors Association Center for Best Practices and Council of Chief State School Officers. All rights reserved.”

Saturday, August 31, 2013

Four Easy Ways to Develop Small Motor Skills in Early Learners


      These jumbo sized plastic tweezers are perfect for developing hand muscles in tiny pupils. They have large easy to grip handles and require the child to apply a considerable degree of pressure to ensure firm control of the object he or she is moving. These two factors are important because the tool needs to be safe but also effective in gradually increasing strength of a small child over a period of it's use. 
      Early learning centers often supply activities that require the use of tweezers such as these. The tasks appear to be almost too simple on the surface until you pick up the tool and squeeze it between your pointing finger and thumb. This is not such an easy task for a two or three year old. In order for the tool to work, however, one must supply ample opportunities for it to be used on a daily basis.

    
    Tracing both around a heavy cardstock stencil as well as inside of one is an excellent way to build up a child's eye-hand motor coordination. Very simple shapes should be used to begin the exercise with. Then the instructor should gradually complicate the stencils in order to build dexterity and patience in the student. 
      As the child ages, teachers may then ask him or her to cut out the shapes they have traced with the stencil. The progression of this technique will cause students to constantly focus and adapt their abilities to task. 
      Above are examples that I would expect a fourth grader to successfully cut out. However, a third grader should have no trouble with tracing around or inside these shapes. Younger children should be given geometric stencils and also be taught the names of their shapes in preschool.


      Lacing cards come in every shape, size and theme. These are also easy to make with clipart, a whole punch and heavy cardboard. The lacing cards pictured above are coated with a durable plastic so that they will endure heavy use; some lacing cards are actually made of wood. Students may use yarn, ribbon or shoe laces to string in and out of the holes around the pictures. 
      The literal act of pushing a lace through a small hole forces a child to manipulate tiny objects in a restricted way. These movements are early preparation exercises for writing. Hand control skill learned with this toy will help to insure that similar control over a pencil. Like many small motor exercises, lacing cards must be repeated daily in order for it their benefit to be substantial. Parents, teachers and child care providers should encourage their young students to lace cards, pinch with tweezers and draw around stencils for at least ten minutes every day up until they have mastered handwriting.


      Above is a zipper purse designed in the colors of a rainbow. This zipper purse is very easy to manipulate and is probably better suited to an infant. Dolls and quite books made with zippers, buttons, shoe strings, snaps etc... are also very popular toys designed to develop eye-hand coordination in young children.

More Related Links:

Create A Manuscript to Cursive Chart

      During my student teaching program, I developed several art lessons integrating cursive writing. Many of my second grade elementary students did not know how to read or write cursive because it was no longer being taught in that particular district. It was necessary for me to create a chart that students could refer to as they created picture designs with cursive letters. This chart was very large and could be easily seen from any table in my classroom. 
      The students loved learning the old form of writing and the second grade teachers were very pleased with the inclusion of the lesson in our art classroom as well. Unlike some homeroom teachers, art teachers in Missouri are free to integrate penmanship projects into their lesson plans without constraint. 
      I am of the opinion that no English speaking country should neglect teaching students to read their own language, if they can possibly help it. It is entirely irresponsible on the part of any state to exclude cursive reading and writing, even though it is not used nearly so much in our time.  For if we neglect to pass down obvious knowledge, our children will become easy to control and be easily manipulated by those who may not have their best interests at heart.
      You cannot imagine the grief that I felt, when I discovered that so many of the high school students that I taught during my student teaching program could not read any kind of text. Then after being placed into a wealthier district for elementary training, I discovered that well over half of those young students could not read or writer a cursive letter. How easy it will be to control the minds of these American students. The parents, politicians and teachers have endangered the futures of these children in my opinion. (My heart is very sad over this.)

      Illiteracy: The Downfall of American Society It is a chronic crisis of huge proportions, one that keeps millions of Americans living in the shadows.