 |
| Help the farmer's cow find her way back from the pasture to the barn. |

Saturday, October 5, 2013
A Simple Farm Maze for Little Folks
Pumpkin and Jack-O-Lantern Number Books
 |
| Crafting and gifting little number books for Fall related themes is not all that uncommon in day care programs or early learning centers. So, I have decided to submit here a few simple ideas of my own. You can use the same patterns for either version of this craft. One version is a spooky Jack-O-Lantern and the other is a decorative pumpkin. Both crafts include pumpkin seeds as the elements that young students are to count on each individual page. |
 | |
| As you can see, students may count the seeds and also associate the written number with the quantity of those seeds on every page. Don't forget to include zero at the very beginning. Each of my number books includes 11 pages. Above, you can see the decorative pumpkin cover using painted papers. |
 |
| Here is my Jack-O-Lantern version of the same project. I have also included a little "illuminated candle on every page as well! |
 |
| Above is my page of patterns for both versions of this little Fall number book. Below is an additional page of burning candles that I have drawn for those of you who would prefer to turn your fall number book into a Jack-O-Lantern. |

Craft a Paper Scarecrow Jumping-Jack

For this little craft, you will need Autumn colored papers in a check, a plaid and four solid colored papers. You will also need 12 brass brads, one set of googly eyes, two buttons, a paint stick, scissors, white glue and one black felt tip marker.
Download and print the stencil pattern that I have drawn for the scarecrow Jumping-Jack. Trace and cut the pattern pieces, use a hole punch to clip through the papers at the x markings. Assemble the scarecrow according to the sample shown above. Mount him onto a paint stick or a wooden dowel. I did not string this particular Jumping Jack but you can string him.
 |
| A free Jumping Jack pattern by Kathy Grimm. |
Thursday, October 3, 2013
Trace, Cut and Paste Developmental Learning Activities
 |
| A sampling of trace, cut and paste developmental learning activities coming soon to this blog. |
Trace,
cut and paste, developmental learning activities are very popular lessons
taught inside preschools, kindergartens and early learning centers. In the early
learning center where I teach, students complete at least two of these kinds of
exercises per week. The reason for this is obvious to those people who have
ever observed the fundamental learning that takes place during any primary
school’s curriculum. All young students experience some difficulty in
developing the levels of obedience, observation and productivity that are
required of them in order to be successful in academic environments. These
qualities can be developed over a few short years by a loving, patient, and
creative team of teachers (or parents) in order for children to be properly
prepared for school.
I
have listed below, the preliminary objectives that educators assign to this
type of activity. Very young students take at least an entire year or longer to
accomplish these agenda. Ordinarily, art teachers would be expected by the
State to qualify activities such as these by presuming that goals/objectives
would be attainable within one lesson. This expectation is highly unrealistic
for three, four and even five year old students. Most young students will not
be able to fulfill all of the objectives concurrently until they have practiced
them over and over for many months. The ultimate goal of the exercise is: to
teach students to perform perfectly together all of the objectives within the
context of the assignment, by the end of their kindergarten year, not by the
end of the exercise.
Below
are the objectives for trace, cut and paste assignments that eventually must be
performed concurrently:
- Students will learn to listen and follow directions in the order in which they are given.
- Students will learn to recognize shapes and use their correct names.
- Students will learn to recognize colors and to use their correct names.
- Students will learn about spatial relationships and differences between basic shapes.
- Students will learn how to paste elements in an organized fashion in order to create an image.
- Students will learn how to cut simple geometric shapes accurately with scissors.
- Students will learn how to trace around a simple geometric shape while maintaining that shape’s original proportions.
- Students will learn to recognize and act out basic instructional vocabulary.
- Ages & Stages: Learning to Follow Directions
- Why Colors and Shapes Matter
- Color and Your Daycare Center
- Preschool Key Developmental Indicators (KDIs)
- Shape and Space in Geometry
- The Geometric World of Young Children
- Creating Better Writers with Preschool Tracing Activities
- Effective Vocabulary Instruction by Joan Sedita (PDF)
Wednesday, October 2, 2013
"In October" Poem
By Mrs L. C. Whiton.
There are lingering south-winds softly blowing
That to billowy waving the ripe grain bear;
There are dark-winged butterflies languidly going
Floating through golden air;
There are mists like vapor of incense burning,
That are rolling away under skies that are fair;
There are brown-faced sun-flowers dreamily turning,
Shaking their yellow hair.
There are noisy bees that are tired of winging
That are holding a court in some wild rose's heart;
There are sudden thrills of the late sweet singing
Of birds that are loth to depart;
There are sunsets watching their own hot blushes
On the breast of the ocean burning away;
There are wind-swept pines in the infinite hushes
Whispering as they sway.
There are changing ferns in the shadows lying,
Where the undried dews in the noontides stay;
There are gorgeous-hued leaves where, rustling and sighing,
Quivering sunbeams play;
There are tangled vines in the hollows trailing;
There are short sweet days that will not delay;
There are nights that come with a moonlight veiling
And Autumn going away.
"The Cornstalk's Lesson" Poem
 |
| This poem may be downloaded and printed freely by teachers everywhere. |
By Mrs Christine Chaplin Brush.
One single grain of corn took root
Beside the garden walk;
"Oh, let it stay," said little May,
"I want it for my stalk."
And there is grew, until the leaves
Waved in the summer light;
All day it rocked the baby ear,
And wrapped it warm at night.
And then the yellow corn-like silk came--
A skein of silken thread:
It was as pretty as the hair
Upon the baby's head.
Alas! one time, in idle mood,
May pulled the silk away,
And then forgot her treasured stalk
For many a summer day.
At last she said, "I'm sure my corn
Is ripe enough to eat;
In even rows the kernels lie,
All white, and juicy sweet."
Ah me! they all were black and dry,
Were withered long ago;
"What was the naughty corn about,"
She said, "to cheat me so!"
She did not guess the silken threads
Were slender pipes to lead
the food the tasselled blossom shook
To each small kernel's need.
The work her foolish finger wrought
Was shorter than a breath;
Yet every milky kernel then
Began to starve to death!
So, list my little children all,
This simple lesson heed:
That many a grief and sin has come
From one small thoughtless deed.
"Roasting Corn" Poem
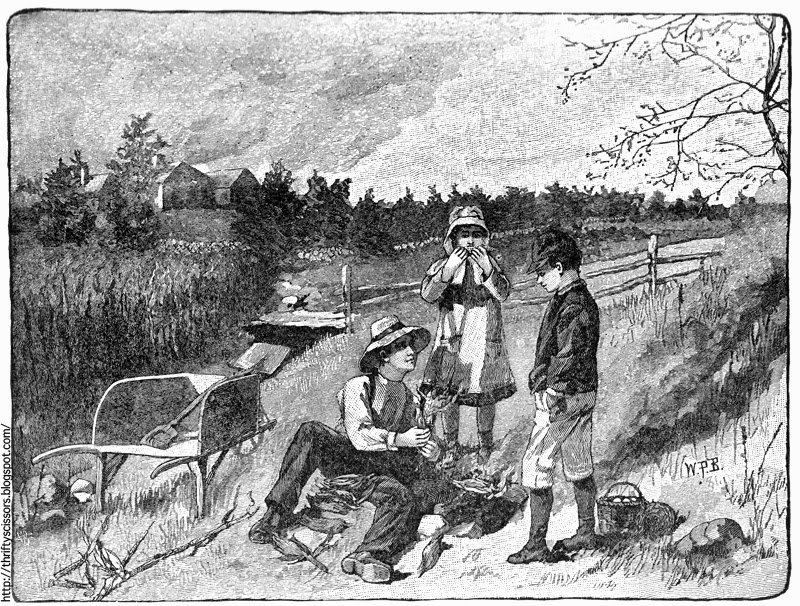
By Mrs. Clara Doty Bates.
A faint blue cloud of smoke
Creeps up the golden air:
It must be the wandering gypsy folk
Have lighted a fire there.
No doubt they have covered vans,
And ponies shaggy and lean,
Which they will tether with dusky hands
Along the wayside green.
And the bells on their bridles hung
Will tinkle idly sweet,
With the chatter of children, rude of tongue
And bare of feet --
While, with grimy tents spread out,
Their elders lazily
Wait for the steam of the kettle-spout
To burn the time for tea.
Though surely I can get
But whiffs of the camp-fire smoke,
And though I know they are vagrants, yet
I will visit these gypsy folk.
Well, now! and is this Jack?
This Gold-locks? and this Ted?
With clothes and fingers a smutty black
And cheeks a burning red--
So hungry and forlorn,
In grandpa's ample house,
That you must pilfer an ear of corn
And nibble it like a mouse?
Will I have some? The smell
Is of itself a treat.
I'll trust the boys and girls to tell
When things are good to eat!
(All poetry on this blog is in the public domain folks.)
(All poetry on this blog is in the public domain folks.)
Paint Fall Foliage With Hugs and Kisses
 | |
| This picture of Fall foliage was created entirely with dots. |
This picture was painted with Dot paint markers. Dot paints are frequently purchased for early learning center art activities. These paint bottles have foam tips and are just the right size for little hands to squeeze and paint with. The round shapes of my tree's foliage are actually painted coffee filters that are pasted onto a large piece of blue construction paper after drying. I cut a simple tree trunk from brown construction paper to paste on top of the blue background as well. The blank circular shape is for each child to "carve" their names inside after they have completed the assignment.
Because dot painting is so easy to do, it is important for teachers to give young students enough of a challenge when filling in space with their paints. A picture like this will take a preschool student at least forty minutes or more to finish. Teachers may have students complete the foliage on one day and then assemble the picture with additions to the trunk, sky and ground on a second day. In any case, one large dot picture should take a week for three to five year old children to complete nicely.
Encourage students to fill in all of the spaces. Then give them markers of similar color and demonstrate how to add Capital Xs to every circular shape. This may appear on the surface to be busy work but it serves the purpose of training small motor skills in very young students by virtue of a pleasant activity. Here are a few goals associated with the activity that teachers may wish to include within a weekly lesson plan:
- Color matching
- Writing the Capital letter "X"
- Learning about color families or cool vs. warm colors
- Defining space
- Defining boundaries in space
- Manipulating objects by squeezing and placement
- Recognizing and reproducing geometric shapes
- Teaching science concepts to children: this one would be photosynthesis.
- Learning about additional symbolism given to letters, i.e. hugs and kisses are x's and o's
Monday, September 30, 2013
Paint, Cut and Paste a Leafy River Scene

The project may be completed over several consecutive days in an early learning center environment:
- First day: Collect and share fall leaves from your center's playground and/or surrounding neighborhood.
- Second day: Draw and cut many stencil patterns from the leaves that students have collected from the previous day. Let students play with the stencils, discovering how these can be layered or moved about in order to mimic the creatures depicted in the Leaf Man book.
- Third day: Draw plastic combs through acrylic and glitter paints on construction paper to recreate the Autumn colors found in the student's leaf collection.
- Fourth day: Trace the leaf stencils onto the decorated papers and cut them out. Now let each student paste together his or her own river scene depicting fish and turtles similar to those illustrated in the Leaf Man book.
- Fifth day: Let the students help you display their dry art works in the hallway or classroom of their school. Serve up some warm cider or chocolate and talk about all the things they have accomplished while enjoying the fall leaves!
Harcourt Trade Publishers also includes a fun teacher's guide for an alternative art project. Below I have linked to additional fall leaf lessons that young students may enjoy.
- Fall Line Leaves from The Art of Education
- Fall Leaves Lesson from Deep Space Sparkle
- Why do Autumn Leaves Change Color?
- Art School: Fall of the leaf
- Explore fall themes to develop early learning centers
- Preschool themes and lessons about fall
 |
| Students paint, cut and paste leafy fish and turtles to swim in their colorful blue river. |
 |
| A detail of the paper turtle cut from papers combed with glitter paints. |
 |
| Young students can achieve very professional looking results when they work from stencils. Collecting, tracing and cutting leaf stencils is a very complex exercise for little students but it teaches them confidence, patience and a set of tasks that will generate excellent results. Chunk down lofty goals into to smaller tasks that may be performed successfully and your little artists will achieve great things! |
This popular children's book is read by Jonah.
Craft a Paper War Bonnet
 |
| To craft a war bonnets, you will need a tape measure to determine the circumference of each student's head. Cut strips of construction paper approximately one additional inch longer than the measurement of each child's head. Staple the two ends together so that these overlap by the additional inch after the paper band has been decorated with markers depicting native motifs. Cut and paste on to the backside of the headband, feathers made from colorful construction paper. You may also fringe the edges of the papers by slashing these with scissors if you'd like. |
Feathered war bonnets (also called warbonnets or headdresses) are worn by honored Plains Indian
men. In the past they were sometimes worn into battle, but most often
worn for ceremonial occasions as is the case today. They are seen as
items of great spiritual and magical importance. The eagle
is considered by Plains tribes as the greatest and most powerful of all
birds, and thus the finest bonnets are made out of its feathers.
Its beauty was considered of secondary importance; the bonnet's real
value was in its supposed power to protect the wearer. The bonnet is
still only to be worn on special occasions and is highly symbolic.
The bonnet had to be earned through brave deeds in battle because the feathers signified the deeds themselves. Some warriors
might have obtained only two or three honor feathers in their whole
lifetime, so difficult were they to earn. The bonnet was also a mark of
highest respect because it could never be worn without the consent of
the leaders of the tribe. A high honor, for example, was received by the
warrior who was the first to touch an enemy fallen in battle, for this
meant the warrior was at the very front of fighting. Feathers were
notched and decorated to designate an event and told individual stories
such as killing, capturing an enemy's weapon and shield, and whether the
deed had been done on horseback or foot.
After about ten honors had been won, the warrior went out to secure
the eagle feathers with which to make his bonnet. In some tribes these
had to be purchased from an individual given special permission to hunt
the bird; a tail of twelve perfect feathers could bring the seller as
much as a good horse. Some tribes permitted a warrior to hunt his own
eagles. This was a dangerous and time-consuming mission and meant that
he had to leave the tribe and travel to the high country where the bird
could be found. When the destination had been reached, ceremonies were
conducted to appeal to the spirits of the birds to be killed.
A chief's
war bonnet is made of feathers received for good deeds to his community
and is worn in high honor. Each feather would represent a good deed. A
warrior's war bonnet, such as the famous war bonnet of Roman Nose, the Cheyenne
warrior, was said to protect him during battle. In several instances,
Roman Nose, wearing his war bonnet, rode back and forth before soldiers
of the United States Army during battles of the Indian Wars and, despite being fired upon by many soldiers, was unscathed.
Draw a Design from A Spider's Web
 |
| Start your web design by randomly selecting a point, on a sheet of black construction paper, somewhere in the center of your paper. Then draw, with the help of a ruler, lines from that central point out to the edges of the paper. Your design should look something like a giant sliced pie. |
 |
| Then take either a bottle of white school glue or black puff paint bottle, and squeeze out a thin line of liquid tracing the drawing thus far. Then, very carefully, squeeze out the intersecting spiral lines of the spider's web pattern leaving large spaces approximately 1/2 inch to 1 or 2 inches apart. |
 |
| Next, you will need to fill in these spaces of your web design with chalk pastels. After completing the design, Teachers may spray fix the pastels with either a special fixative purchased for the preservation of chalk pastel drawings or with a inexpensive hair spray. |
 |
| A close up view of my spider's web design. This art project is an exercise in calculation, glue application, and a introduction to chalk pastels. I recommend it for 2nd through 4th grade students. |
Sunday, September 29, 2013
Craft a Ruote Pasta Web
These little Ruote, more commonly known as wagon wheel pasta in America, make interesting design elements in a spider web craft for early learners.
First, teachers will need to dye these Ruote pasta black:
- Add the dryed Route pasta to a large zip-lock plastic bag. (1lb. per large freezer bag at a time)
- Include a few teaspoons of rubbing alcohol and a few drops of black food coloring inside the bag with the dryed pasta.
- Close the bag tight and shake.
- Pour this pasta out onto a napkin or paper towel to let it dry either in the sunshine or overnight in a warm place.

Left, a view of the Ruote pasta spider web from the side. Right, a view of the pasta spider web from above.
Once you have prepared the dried pasta for your young students, you will need to gather the following supplies:
- black construction paper
- white school glue
- dyed black Ruote pasta
- white tempera or acrylic paint
- newsprint to cover the table with
- Q-tips and cast off plastic lids for the gluing process
Step-by-step Instructions:
- First, have the young students play at arranging the pasta on the table top before actually gluing it down to the paper. Talk to them about the shape, texture and color of the pasta while they experiment with arranging it.
- Give each student a handful of pasta, a black piece of construction paper, a plastic lid full of liquid white school glue and a Q-tip for dipping into the glue.
- Demonstrate to them, at their table, how to dip the Q-tip into the glue and then glop it onto the construction paper. This process of applying glue to the paper will help little people add enough glue for the pasta to stick to the paper but not so much glue that they cannot control it's application all together.
- Now the pasta may be layered on top of the glue and arranged in a web like pattern.
- These 'spider webs' will need to dry overnight in the classroom.
- On the following day students should each be given another plastic lid filled with non-toxic white paint.
- Show your early learners how to dip their fingers into the white paint and dab it lightly onto the very tops of the Ruote in order to highlight the pasta's design.
- Let the webs dry again. This takes only an hour or less.
Subscribe to:
Posts (Atom)