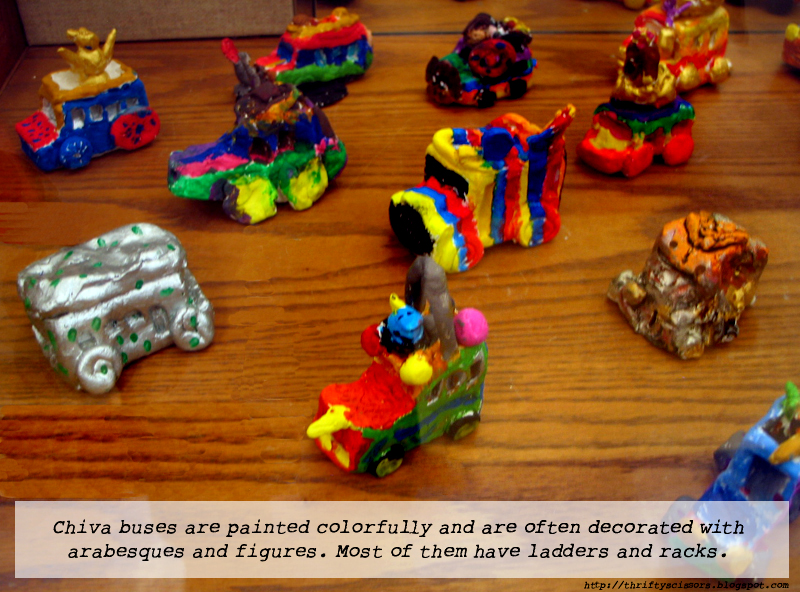
These fifth grade students studied the brightly colored buses, Chivas, of Latin America. This transportation is unique to the culture of people who live south of our Mexican boarders. Students shaped clay into basic bus shapes and then attached animals, ladders, and people to the outside of their buses before painting them in bright, bold acrylic paints.
These artisan rustic buses are adapted to rural transport.
Chivas must carry passengers, luggage, and sometimes even domestic animals over mountainous terrain.
The four periods into which the year is divided by the ever-changing position of the earth in relation to the sun. As the earth revolves about the sun in nearly circular obit, its axis at all times points toward the Pole Star and is inclined to the plane of its orbit 23 1/2 degrees. Therefore different parts of its surface are at different times of the year exposed to the vertical rays of the sun. Astronomically speaking, in the northern hemisphere spring extends from March 21, the time of the vernal equinox, to the summer solstice, June 21; summer from June 21 to September 21, the time of the autumnal equinox; autumn to December 21, and winter from that date to the beginning of spring. In the southern hemisphere the seasons are reversed, and spring begins September 21. In the torrid zone the changes in the seasons are not marked by differences in temperature, but by wet and dry periods.
Artifacts included here come from several of my blogs featuring the holidays and/or weather related content.
Woven tree art project may be used to incorporate any
season: Spring, Summer, Fall or Winter, depending
on the landscape and colors used in the selection of
yarns as well.
Use a fast drying paint for the first half of this art assignment so that the paper plates will not warp.
This weaving project is accomplished in two parts. Above is the first part of the assignment. Teachers review or teach for the first time what a landscape is in art. Then students paint their own version of a landscape using acrylic or tempera paints, whichever is available in their classroom, on the inside of a paper plate. Make sure they include a foreground and a background. Above you can see that there is a nice variety of landscapes represented by these students: a green park-like setting, a couple of deserts including cactus and a glimmering lake with a rainbow above it. Below a student painted a lush green and blue mountain landscape with a white fluffy cloud hovering above.
The worp of the tree branches is strung around the notches above and tied off at the bottom.
For the second half of this art lesson, students will need yarn and scissors to notch the edges of their paper plate. These notches do not need to be exactly placed. In fact if the notches are a bit off, the result can be quite charming. Wrap the worf of the tree in and out of the notches as shown above.
The simple process of wrapping a yarn tree trunk.
At the bottom of the plate, where there are only two notches, students will need to wrap a smaller length of yarn to form the trunk of their tree. they should make this trunk approximately one to two inches in length.
A colorful assortment of woven trees from these second and third grade students.
Next, student weavers may pull yarn lengths in and out of the worp forming what is called the weft of the weave. They may choose to make a striped pattern to represent the leaves of their trees if they wish. All in all this makes quite a striking art exercise when completed!
Part 1 of the weaving project from Cassie Stephens.
Sometimes, teachers over think things like bulletin boards. Tack up a bright butcher paper to cover an old cork bulletin board and then let your students do the rest! I contributed a few scissors and glue bottles while everyone else laughed and scribbled.
Young students should be allowed to feel they have a say in how their everyday spaces look. This bulletin board was decorated by kids in an after school kid care program. I hung up their paper puppets, drawings, and coloring sheets in just a few minutes. This old cafeteria never looked so colorful! I think they did a great job!
On the upper left hand corner of the bulletin board I stapled the "visual" directions of how to assemble the turtle puppet. 1. color, 2. cut, 3. paste. The bulletin board was then filled in with the children's crafts. It got even fuller than what is depicted above over the following weeks.
Directions for the Town Hall. Cut around the outlines. Fold on dotted
lines,
tuck tabs inside and where shown paste together as drawn in the
above "model" sketch.
Well, just when I thought that I had found all of these little
village templates, out crops another one! Searching newspapers is a
tedious process, even for an archivist! But here is the Town Hall;
better late than never. I think it is the last of the series? I've cleaned it up, folks. Don't forget to enlarge it as much as possible before printing it out.
Samples of paper village buildings and dolls in this index.
In this index, young visitors will find all sorts of paper playthings that will keep them preoccupied for hours or perhaps even days. There are paper people and animals to color, little art lessons including paper doll crafts and lots of templates for crafting paper buildings.Enjoy and don't forget to check back for new additions!
Illustrations of a box apartment, it's windows, walls and a basic floor plan.
How To Make A Box Apartment For Your Paper Dolls
Girls and boys who are fond of paper toys might enjoy making an apartment for their paper characters similar to the one pictured above. There is are also patterns for paper furnishings in the list above if they should choose to furnish their paper accommodations as well.
To make the apartment all that is necessary is a sturdy box 24 inches deep. These dimensions are the best for the size furniture that is published above, but if your box is an inch or two longer or shorter or wider or narrower it won't matter very much. If you can not secure a box that is at all near this size it is best to get a larger box and cut it down. A box may also be made of scrap cardboard of the proper dimensions.
The box is divided by a straight partition which goes down the center and two crosswise partitions, which divide the box into six rooms of equal size.
One long side of the box is taken off, as the apartment is to be entirely open across the front, and this sidepiece is used for the long partition which goes down the middle of the box. Before putting the partition in place you should make the doors which lead from one room to another and which are shown in the picture above. Also paper or color the partition with paints to suit the different rooms. In order to do this first decide what color you with for the walls in the rooms to be or if you would prefer; select a fancy scrap paper to paste on top of the walls instead. Divide the long partition into three equal parts by making slits which reach from the bottom half way up the side. Then cut the crosswise partitions long enough to span the box plus four inches deep. These may be cut from the box lid. Each of these crosswise pieces is divided in the middle by a slit which reaches from the top half way to the bottom. Fasten these cross partitions on the long partition at the places where it is cut and then place the partition unit inside the box temporarily to see where each section of wall comes. Then with a pencil mark on each side of the walls of every room which room it is, so that when you disassemble the partitions to paper or color the walls you will understand where everything should go. Paper or color the remaining wall sections inside the box to correspond appropriately.
Next cut the doors in the two partitions. There is a drawing of how these door frames could be finished in the illustration above. There are likewise window types drawn above that could be used as either templates for cutting or ideas for drawing directly on top of the walls of your apartment rooms.